Home | Guides Home
September 10, 2003
November 11, 2005 (Pictures)
Version 1.0
Shadowgate 64: Trials of the Four Towers (N64)
terrisus (terrisus@aol.com)
www.terrisus.com
-------------------------------------------------------------------------------
Index:
Section 1: Introduction
Section 2: Controls
Section 3: Contents
Section 4: Walkthrough
Section 5: Thanks
Section 6: Contact
Section 7: Legal
-------------------------------------------------------------------------------
Section 1: Introduction
Hello, and welcome to my Shadowgate 64 FAQ. If you’re here, chances are you’ve
been playing Shadowgate 64, and have run into some trouble, and are now here
looking for help.
Each part of the walkthrough will be titled with the name of the room or rooms
you’re in, in the order you pass through them, and any items in the room you
can get at that point in the order that you’ll come across them. You won’t
necessarily need every single item in the game, but, as there are no
limitations on your inventory or anything, it’s usually a good idea to pick up
everything you see just in case. I won’t send you out of your way to pick up
items you have no use for, most everything is at least somewhat near something
else you will be needing, and there aren’t that many useless items in the game.
I’ll only be mentioning inventory items however, no books. There are plenty of
books and various other writings scattered throughout the game, which you won’t
actually need to use at any point, but will provide you with some interesting
information about the world around you. Most of them are in fairly plain view
as you progress through the game, however, so, if you want to get them and read
them, that will be easy enough. Just, I won’t be mentioning them specifically
in the walkthrough.
Please note, there is an option in the game to have text displayed in Spanish
instead of English. All of the names and everything in this guide are from
playing the game in English however.
Please also note, all the room names are from the map that you get near the
beginning of the game (accessed using the R button). If you don’t pick up that
map, you’re going to have a bit of trouble figuring out what’s going on.
Picking up the map will be mentioned specifically in the walkthrough, but, make
sure you get it.
I don’t want to say this walkthrough is spoiler-free, because it isn’t, but
I’ve done my best to limit spoilers where they aren’t necessary. That is, I’ll
be telling you the people and items you need to find, but won’t be revealing
the entire story if it isn’t critical to you being able to advance. Half the
fun of the game is just playing through it and finding out what happens, so
this walkthrough isn’t supposed to be a book detailing all of the storyline of
the game. Hopefully it’ll be of use to you if you find yourself stuck at any
point though.
Both the area names and the item names are written exactly as they are in the
game, so, if you’re looking for something specific, you can just do a search
for it in the file.
Also remember to save often, by pressing Start and selecting save. You can save
as often as you want, anywhere you want, and there’s no reason not to save. So
save often, it’ll save you from having to do backtracking if you accidentally
fall into the water or off a cliff or something unpleasant like that.
-------------------------------------------------------------------------------
Section 2: Controls
Analog stick: Move view up/down and side to side
C-up: Walk forward (in the direction you’re facing)
C-left/C-right: Walk left/right, switch menus in inventory screen
C-down: Step backwards
Z: Crouch down
A: Talk, activate, check, most any action command that’s needed
B: Enter inventory screen
R: View Map
Start: Options
D-pad: Not used
L: Not used
-------------------------------------------------------------------------------
Section 3: Contents
4.01: Dungeon
4.02: Drain/Cave
4.03: Disciples' Tower
4.04: Cemetery/Cathedral
4.05: Lakmir's Tower
4.06: Cathedral/Cemetery/Cave/Disciples' Tower
4.07: Gate keeper's room/Street/Pathway to Park/Park/Waterway/Sorcerers Quarter
4.08: Excavation Area 1/Sorcerers Quarter/Pathway to Park/Park/Waterway
4.09: Park/Pathway to Park/Street/Gate keeper's room/Disciples' Tower
4.10: Disciples' Tower/Gate keeper's room/Thieves' Room
4.11: Gate keeper's room/Street/Cathedral/Cemetery
4.12: Cemetery/Cathedral/Cave/Drain
4.13: Drain/Cave/Cathedral/Street/Gate keeper's room/Thieves' Room/Dungeon
4.14: Thieves' Room/Gate keeper's room/Street/Pathway to Park/Sorcerers
Quarters/Agaar's Room
4.15: Sorcerers Quarters/Excavation Area 1/Excavation Area 2/Reservoir
4.16: Excavation Area 2/Excavation Area 1/Sorcerers Quarters/Pathway to
Park/Park/Waterway
4.17: Trial Tower
4.18: Waterway/Park/Pathway to Park/Street/Gate keeper's room/Disciples' Tower
4.19: Gate keeper's room/Street/Pathway to Park/Sorcerers Quarter/Excavation
Area 1/Excavation Area 2/Dragon Tower
4.20: Stable/Castle gate/Chamber of Holding
4.21: Pathway to Park/Park
-------------------------------------------------------------------------------
Section 4: Walkthrough
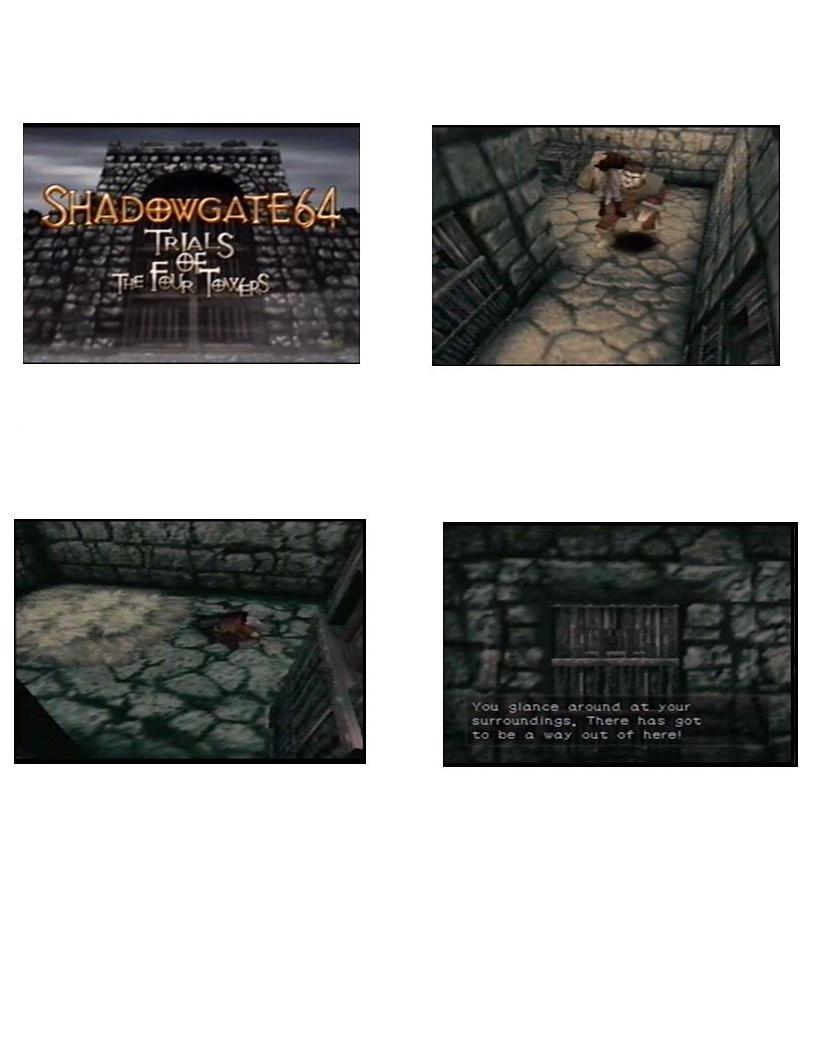
4.01: Dungeon
Items you can get here now: Bone
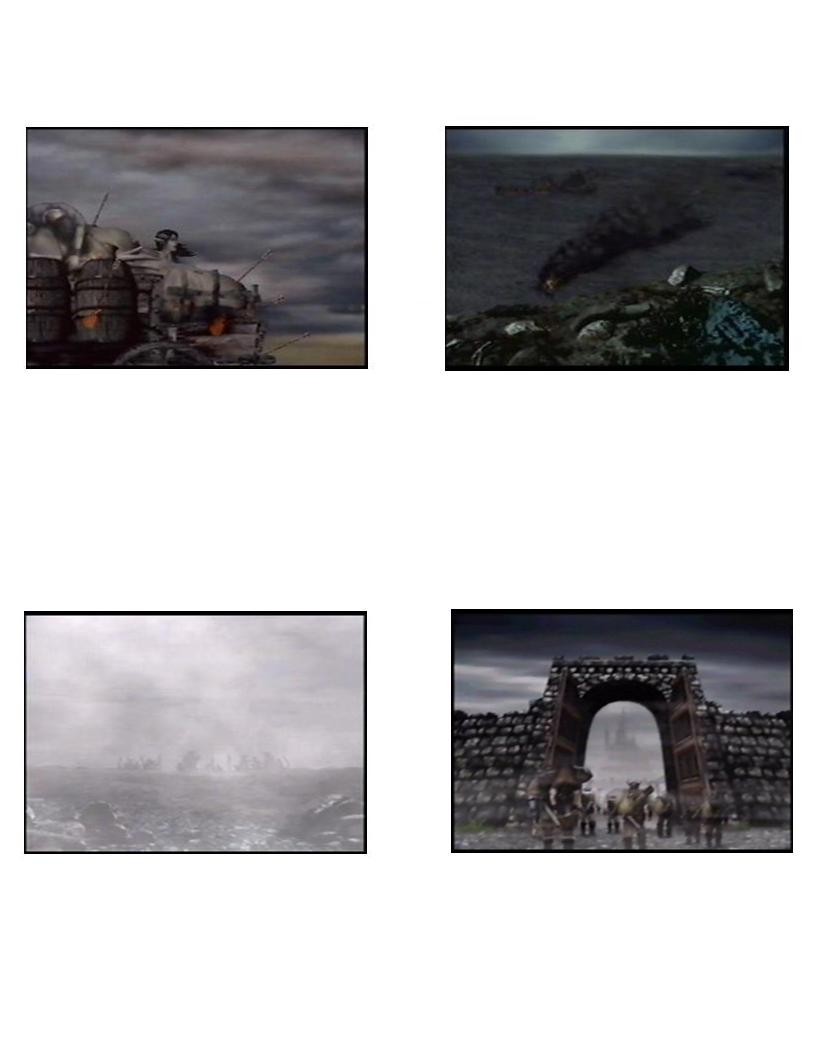
When you start up a new file, the opening sequence plays. In this, the caravan
you’re riding on is captured, and you are brought and dumped into the Dungeon.
You stand up, and this is when you assume control of your character.
Looking around your jail cell, you see a door at one end, a window to the next
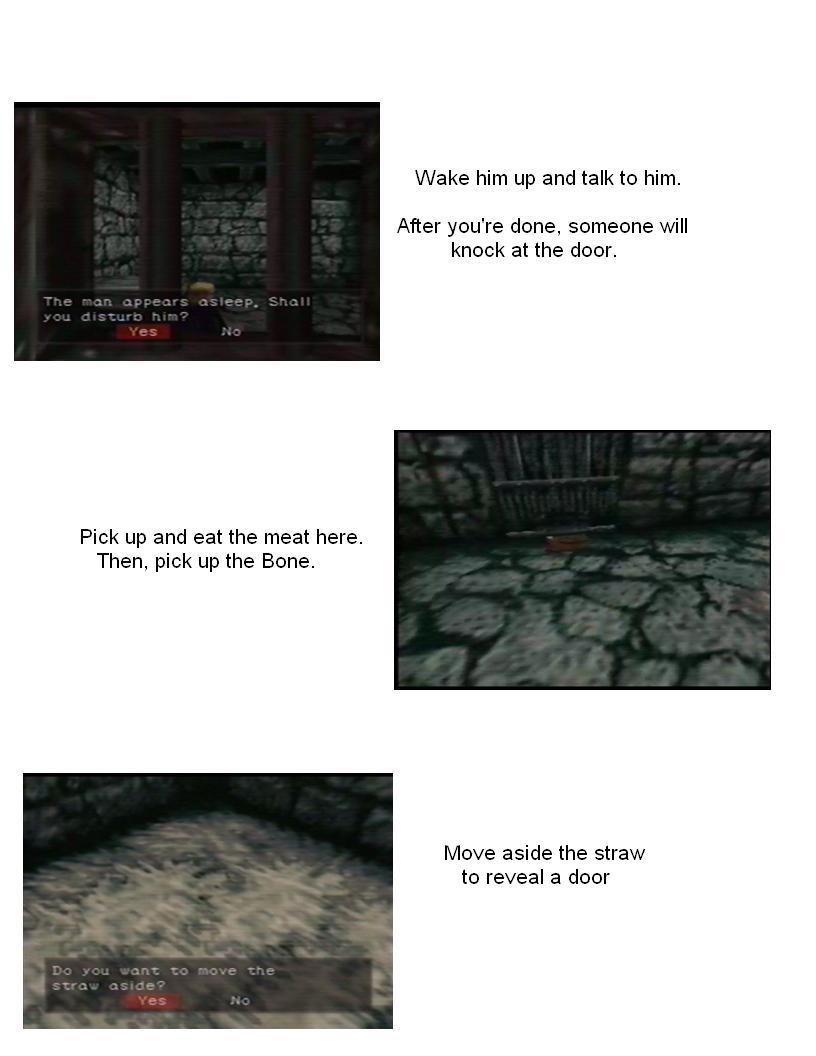
cell on one of the walls. You’ll want to go over to the window and press A to
talk to the person in the next cell. He’ll give you a bit of background
information as to where you are and what’s going on. Talking to him will also
trigger the first event that you need to progress. After talking to him, the
guard will come up and slip some food for you under the door. Go over and look
at it, press A to pick it up and eat it, and a bone is left. Look down and pick
up the bone, and it goes into your inventory.
Over in the cover of the room, you’ll see a pile of straw. Go over to that and
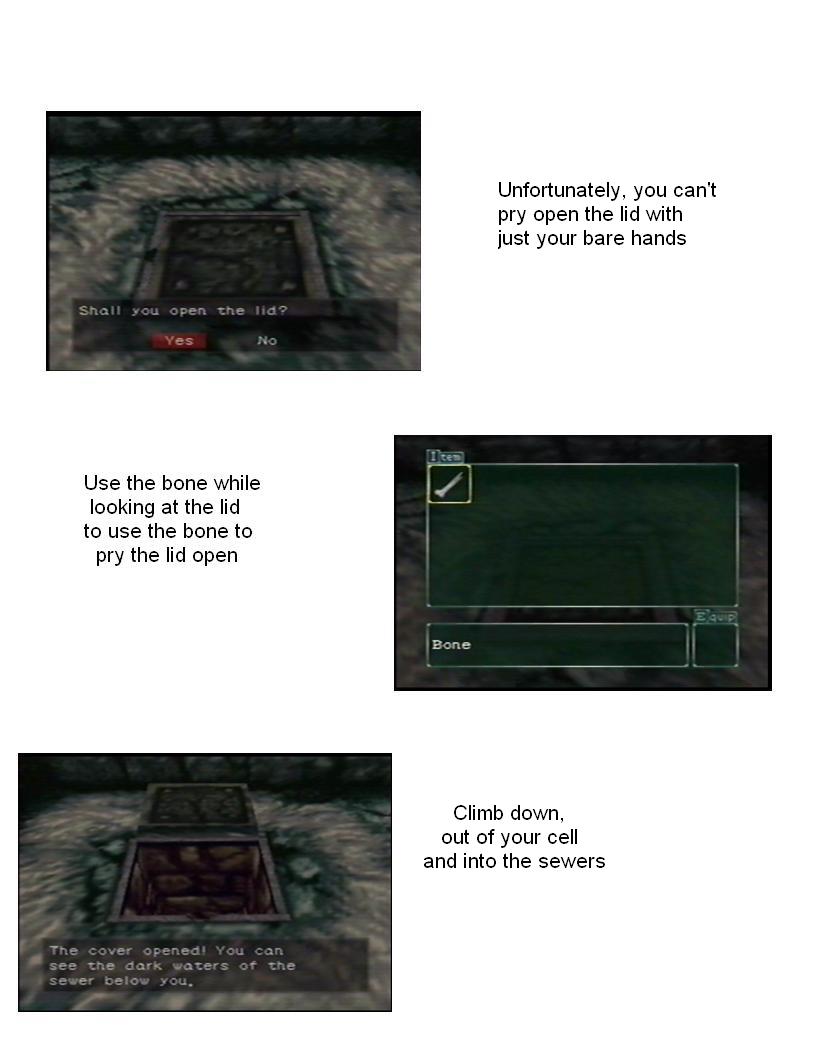
press A to clear it away, revealing a secret door. Trying to pry it up with
your hands is no use, so, while looking at the door, press B to go into your
inventory, and select the bone with A. You’ll use the bone to pry the door
away. Look down and move toward the hole to move through it and out of your
cell.
4.02: Drain/Cave
Items you can get here now: Map, Iron Bar, Pickax
You find yourself in the sewage system below the jailcell. The first thing
you’ll want to make sure to do, is, turn around the opposite way from the way
you entered here facing, and go in the door you see. Look down and to your
right and you’ll see a small piece of paper you’ll want to pick up. This is the
map. Press R at any time to view it.
Turn back around and head back into the drain area. Turn to your right and head
forward a bit and you should see a small barred-off area to your right. Look
down at it and press A, and you’ll be able to pull loose an iron bar. Turn back
to your left and continue heading forward, and enter the first door you see on
your right. You’ll enter a small room, where you’ll just head forward and
progress into the next room.
You’ll enter a room where you see a small lake (you can’t swim), and a large
pillar in front of you. Walk up to the pillar and select the iron bar from your
inventory. You’ll hit at the pillar with the bar, knocking it into the water.
You can now walk across the pillar to the other side and through the door into
the next room.
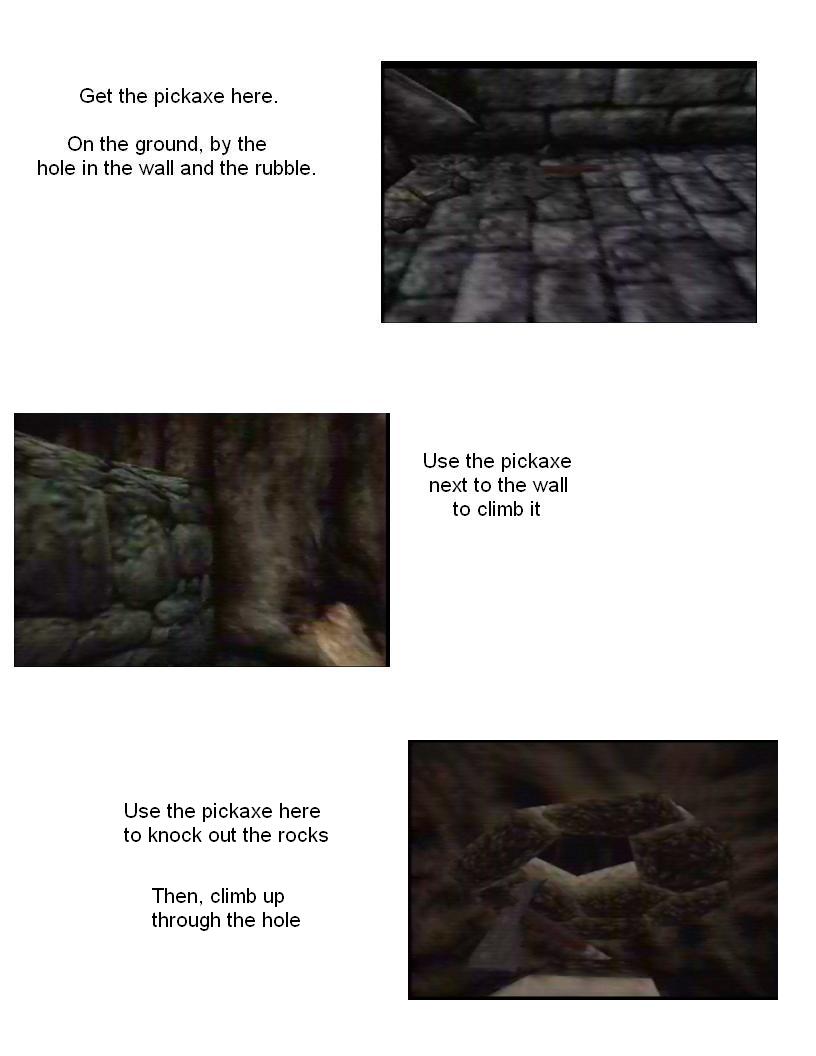
In this room, turn left and head forward. You’ll see a cracked area of wall,
and
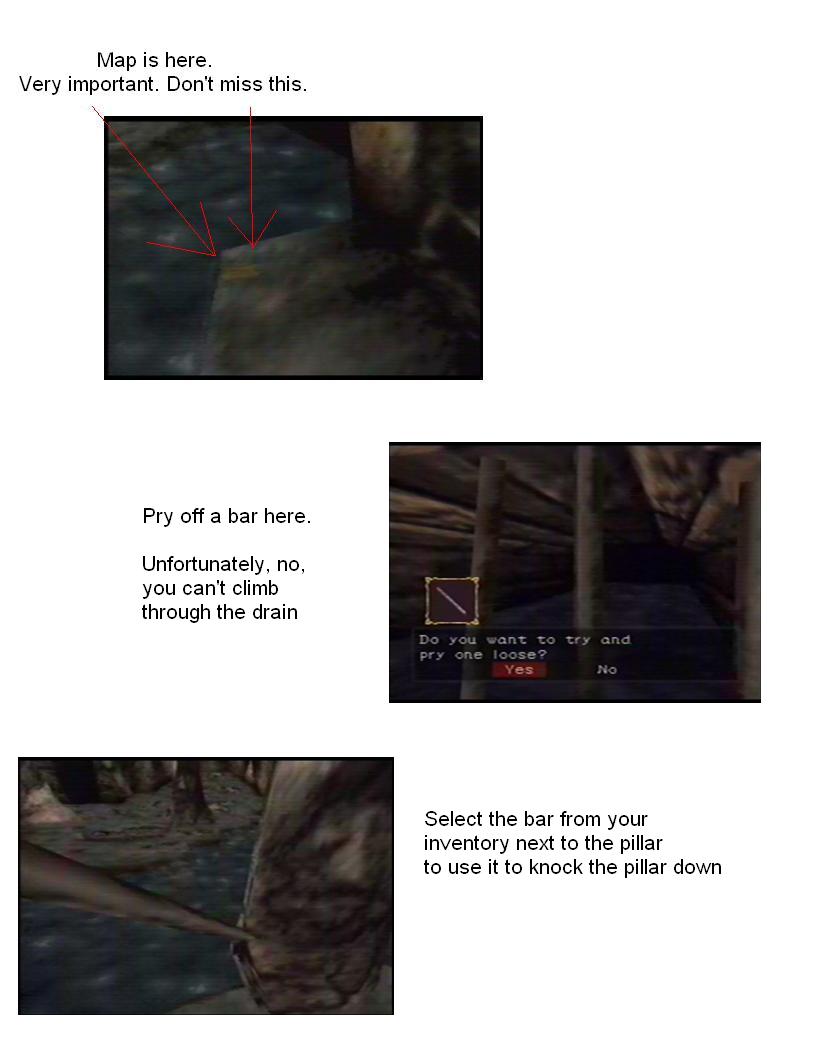
walking over to it you’ll see a Pickax lying on the ground that you’ll want
to get. Now, turn back around and head back the way you came, forward and to
the right, across the pillar and into the next room, through that room and back
into the main drainage area.
Now, turn right and head forward, and go into the next door you see on your
right. Head forward, and turning to your left you’ll see a wall. Select the
Pickax from your inventory and you’ll climb over the wall. Head forward and
left, and then look up and you’ll see a cracked area in the ceiling. While
looking up, select the Pickax from your inventory and you’ll hit away at the
ceiling until a hole opens up. Look up and head toward the hole to move into
it.
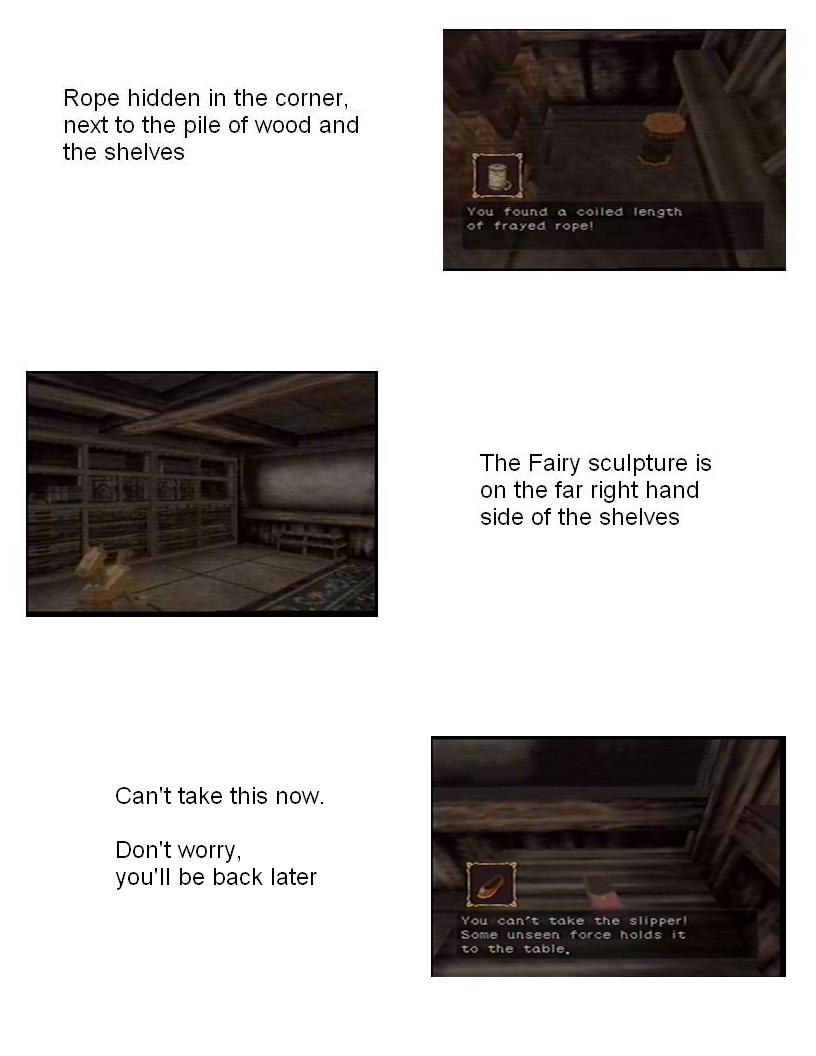
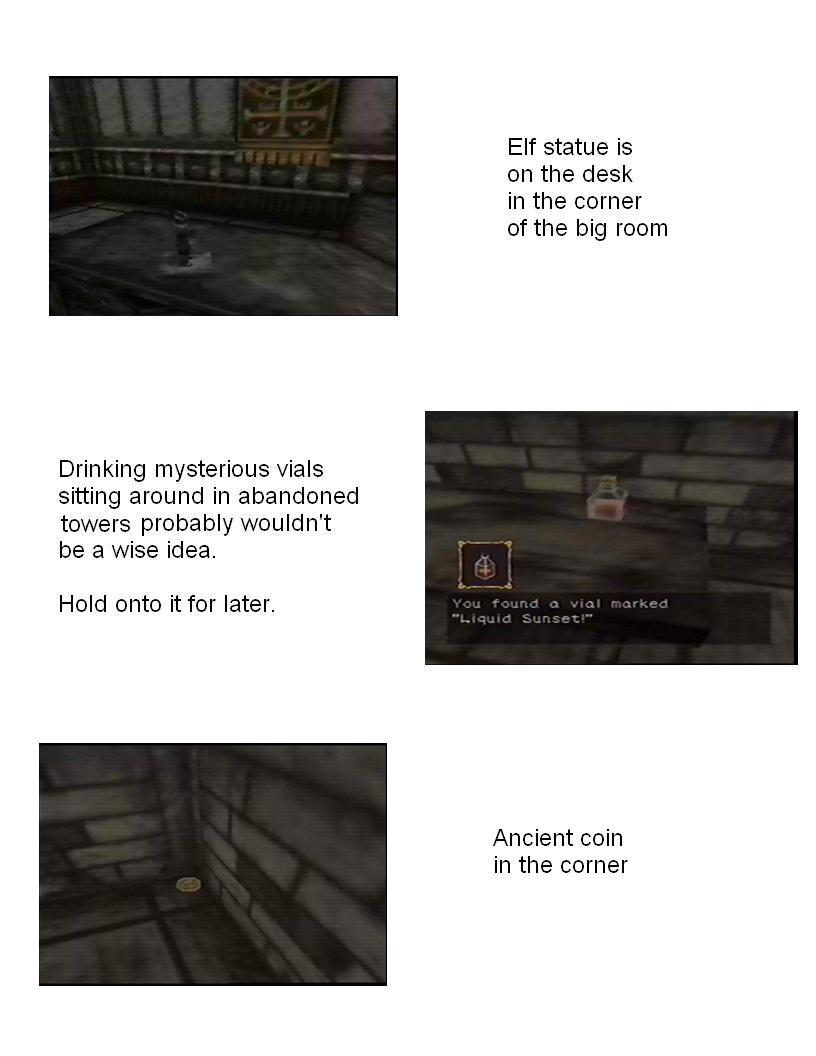
4.03: Disciples' Tower
Items you can get here now: Rope, Fairy Sculpture, Elf Statue, Apeman
Sculpture, Liquid Sunset, Ancient Coin, Primitive Man Statue, Pixie Flute
You’ll emerge inside a tower, the Disciples' Tower, one of the "four towers."
Turn around, and behind you you’ll see a door. Pass through that door into a
hallway, and turn left. Start heading down the hallway and you’ll see a door on
the left, and a door across from it on the right. First enter the door on the
left. In the room you’ll see a pile of wood in front of you. Walk up to the
pile and head over to the right side of it. In the corner past the end of the
wood, on the ground you’ll see Rope, that you’ll want to pick up.
Now, head out of the room and enter the door directly across from you. On your
left you’ll see a shelf. Head over to the shelf and walk along it, and on the
right part of the shelf you’ll see a Fairy Sculpture you’ll need to get. If you
look over on the other side of the room, you’ll see a shoe on the table, but,
you can’t get that now, so don’t worry about it.
Head back out the door, and turn right. Head down the hallway, turn left, and
go up the stairs and then go through the door in front of you. You’ll enter a
large carpeted room. On the other side of the room you’ll see a desk, and
walking over to the desk you’ll find an Elf Statue standing on top of it that
you’ll need to take. Turn back around and head under the passway in the center
of the room toward the stairs. Before you get there you’ll be confronted by
Lakmir, who will give you a short message before you head on. After listening
to him, head up the stairs and into the next room.
You’ll enter a room with many books around, and a window that you’ll be coming
back to shortly. For now, just head through any of the three doors in front of
you (all of them lead to the next room), and you’ll enter a room with more
books, and some stairs in front of you.
Heading up the stairs, you’ll find yourself inside of a small room with doors
on the three walls. Head into the door on your left first. On the ground to the
left of where you enter, on the ground you’ll find a statue of an Apeman you
can get. On a table on the other side of the room is a bottle of Liquid Sunset
to pick up (but not to drink).
Head out of the room and into the door on your right. In the corner to the
right of the door, on the ground you’ll find an Ancient Coin. On a table in the
back of the room is a Primitive Man Statue.
Now head out of this room, and into the door on your right. In this room, on
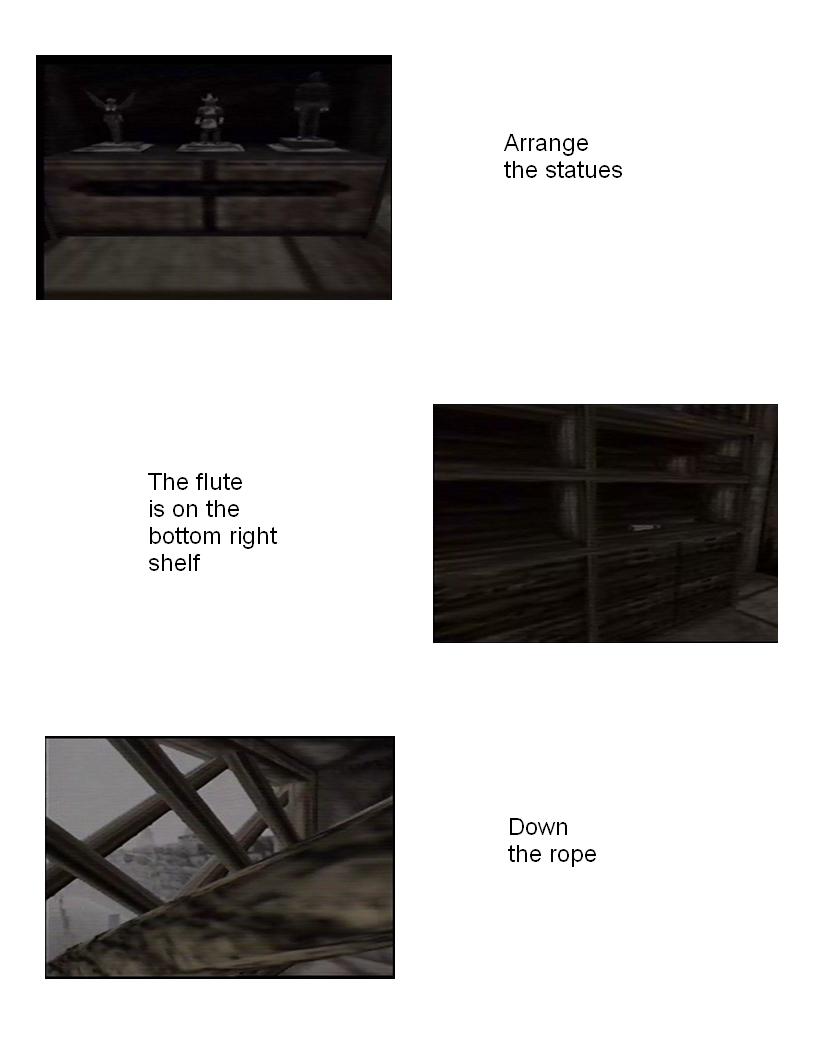
the left wall you’ll see a shelf with three spaces for statues, and a statue of
a man on the right space. Facing the shelf, go into your inventory and first
select the Fairy Sculpture, putting it in the first space. Next, select the Elf
Statue
from your inventory, putting it in the middle space. The shelf slides
away, revealing a stairway. Head up the stairway and you’ll find yourself in a
hallway with two doors on your right.
Enter the first door on your right, and head to the back of the room. On a
shelf in the back, on the right, you’ll see a Pixie Flute which you can take.
Now head back out of the room. The room behind the other door in the hallway
only contains books, so you can get those if you want. Once you’re done there,
from the hallway head back down the stairs.
Pass through the door, and down the stairs on your right. Head through any of
the three doors in front of you into the next room. Turn to your right and
you’ll see a window with a small stairway in front of it. Go onto the stairway
so you’re looking out the window. Select the rope from your inventory and it
will be tied to the wall and go out the window. Now, select the Pixie Flute
from your inventory and it will play, making you small. Look over at the rope
and press A, and climb down it. Once at the bottom, select the Pixie Flute from
your inventory again, and you’ll return to normal size, and you’re now outside,
in the Cemetery.
4.04: Cemetery/Cathedral
Items you can get here now: Dragon Tears, Golden Key, Ornate Key, Crowbar, Nail
In the cemetery, head forward and turn right. Go down the pathway, and at the
end turn right and pass through the door in front of you, into the Cathedral
area. Head forward and go in the door on your left into the Cathedral.
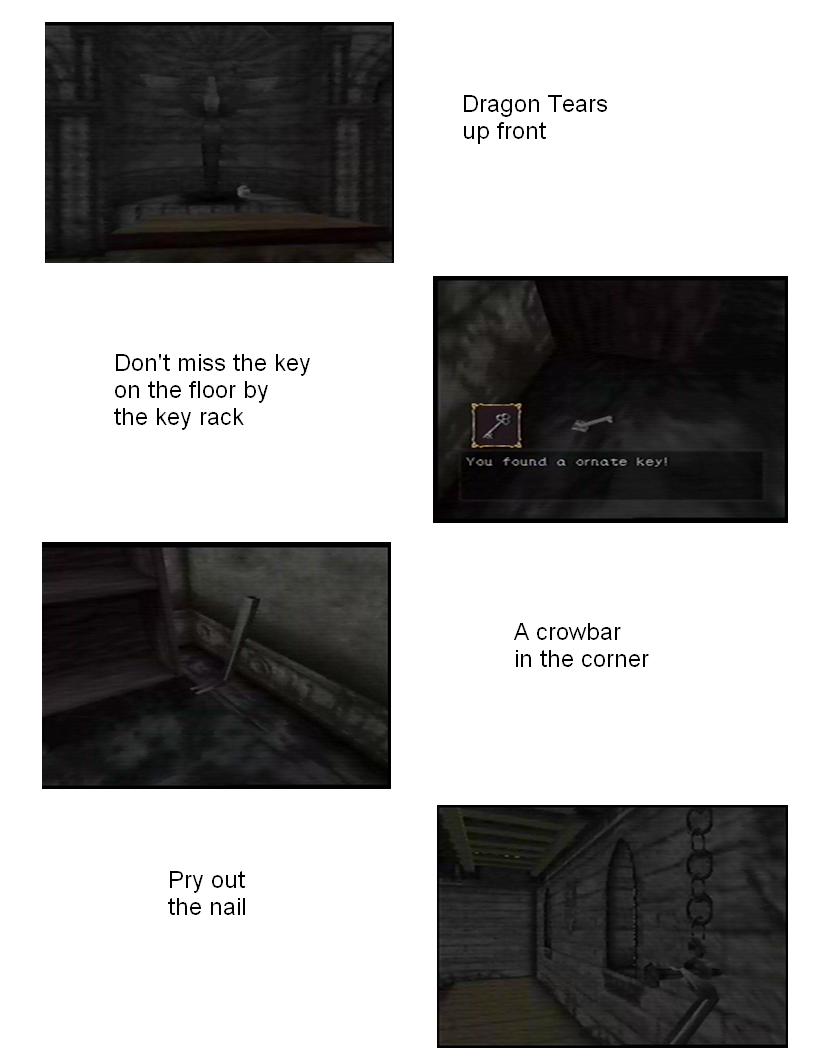
Head to the back, and next to the statue pick up the bottle of Dragon Tears.
Turn back around and head around the seats to your left, under the overhang,
and down the stairs. Against the wall opposite you, you’ll see a key rack with
a Golden Key on it. On the ground next to the shelf to the right of the rack,
you’ll also see another key on the ground, the Ornate Key. On the other side of
the shelf, against the wall, will be a Crowbar.
Now, turn around, forward and left, and head back up the stairs. Go forward and
around the seats, up the middle, and against the back wall on the left side you
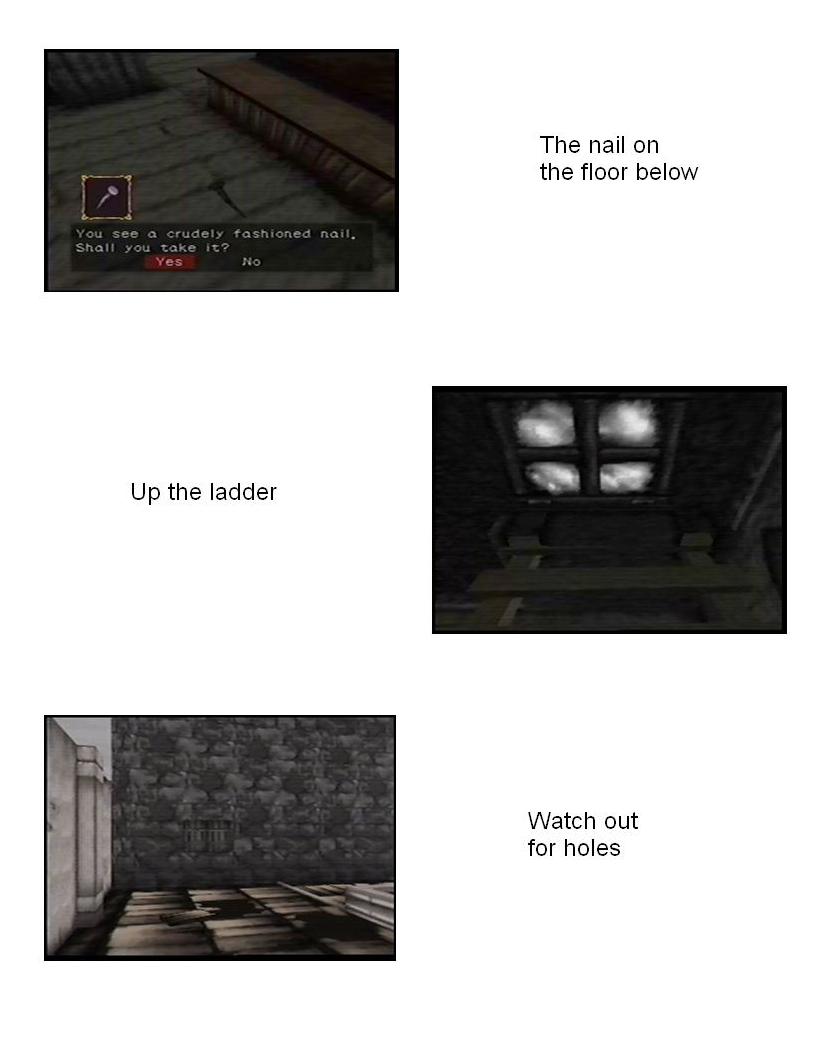
should see a ladder. Go up to the ladder and press A to climb it.
Up on the ledge, you should see a ladder against the ceiling, and on your right
a chain held in place by a nail. Walk up to the nail and select the Crowbar
from your inventory, prying loose the nail and lowering the ladder. Before
going up that ladder, turn around and head back down the ladder you just
came
up. Back on the ground, turn left, and in front of the first row of seats on
the other side you should see the nail on the ground. Go over and pick that up.
Now, go back over to the ladder, climb it, and then on the ledge go forward and
climb that ladder to go up on the roof.
Be careful up on the roof, as there are a number of holes you can fall through
and die. Make your way carefully across to the window opposite you, and press A
to go through, into the next tower.
4.05: Lakmir's Tower
Items you can get here now: Bottle of Oil, Hair of Giant, Mug, Rusty Key, Star
Crest, Water with Dragon Tears, Crest Key, Forest Nectar, Night Elixer, Quill,
The Blue Ring, The Green Ring, The Ring of the Dead
Head forward and through the door in front of you into a hallway. Head forward
and turn to your right, and you'll see doors on your right and left. Go through
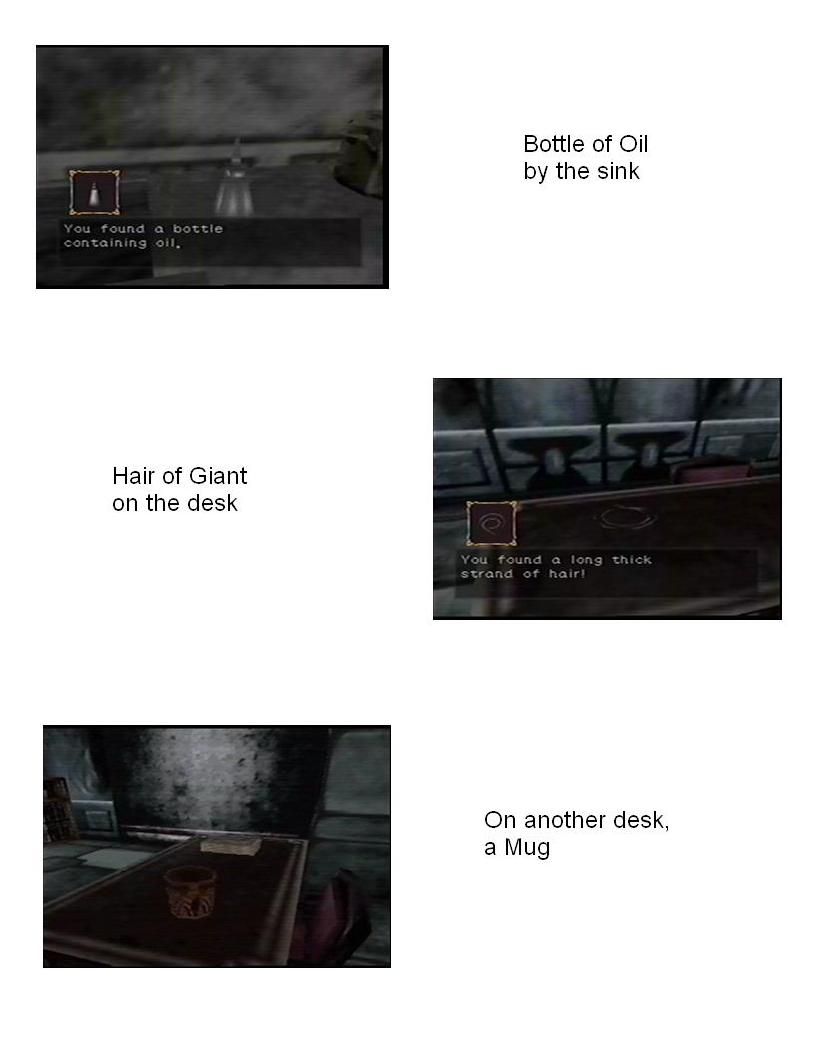
the door on your right, head forward, and on your left you'll see a Bottle of
Oil. Then turn around and head back out of the room. There's nothing for you to
do in the door opposite you right now, so, turn to your left and head forward,
and down the stairway. Once you head down the stairway, you'll run into Lakmir
again and he'll give you some more information. After he's done, head forward
and through the next door, and you'll find yourself on the top of a big
stairway. Head down either set of stairs, on your right or left, and once at
the bottom turn around looking under the platform you were just on to see a
door, and go through it.
Turn to your left and you'll see a door, and go through it. On the desk in the
room you'll find a Hair of Giant. Leave the room and head through the door
opposite you. On the desk in this room you'll find a Mug. To the left of the
desk is a pillar. Go around the left of the desk and approach the pillar, and
on
the ground to the left of the pillar will be a Rusty Key. Head out of the
room, turn to the right, and go down the stairs.
In front of you will be a rusty door. Select the Bottle of Oil from your
inventory to oil the door, and then you can open it. Go forward, turn to your
left, and on your left will be another door. In this room, head to the back,
look to your right, and there will be a door with an object on it. Press A to
take the object, a Star Crest.
Now, turn around and head back the way you came. Through the door in front of
you. To the right, around the corner, and through the rusty door and up the
stairs and through the door in front of you. To either the left or right up
around the stairway, through the door at the top of the stairway, and then up
the stairs in front of you. Go forward to where there's the two doors opposite
each other and go through the door on the right (the room where you got the
Bottle of Oil a bit ago). Turn to your left and you'll see a barrel covered by
a board. Go up to it and press A to remove the board. Now, go into your
inventory and select the Dragon Tears to pour some into the barrel. Then, go
into your inventory and select the Mug to get some of the water from the barrel
in the Mug (Water with Dragon Tears).
Go back through the door, and now go into the door opposite you. In this room,
on your right you'll see a fireplace. Go in front of it, and select the Water
with
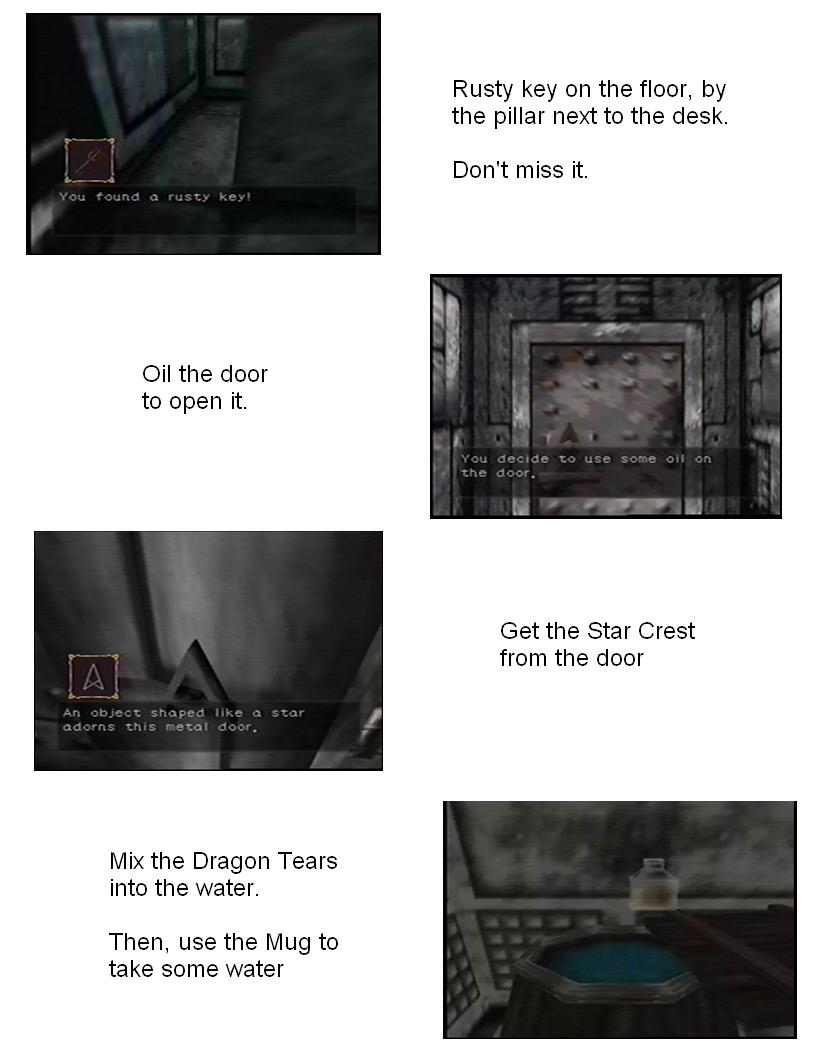
Dragon Tears (the Mug) from your inventory, to pour it onto the fire and
put it out, revealing an engraving behind the fire. Now select the Star Crest
from your inventory to place it into the engraving.
Now it's back again, through the door, turn to your right and go forward down
the stairs, and through the door in front of you. Around either of the
stairways, and into the door under the stairway, down the stairs in front of
you, and through the rusty door. Forward, left, and through the door on your
left, back into the room where you got the Star Crest. Go forward and look to
the right, and you can now go through the door. Walk forward, and you'll have
another conversation with Lakmir. After he's done, turn to your left and you'll
see three statues, which are teleportation points. This is a maze of sorts,
with you having to choose the correct statue path. In the first group of three,
touch the one on the left and you'll be transported to a room with a group of
two. In the group of two, touch the one on the right. You'll then be
transported to a room with four statues, two on your right and two on your
left. In this group of four, turn to your right, and while facing right looking
at the two on that side, touch the one on the left. You'll then be transported
to a room with two statues, and you'll want to touch the one on the right.
You'll now be in a room with two statues, one on the left and one on the right,
with a plaque in the middle. Facing the back of the plaque, touch the statue on
the left, and you're at the
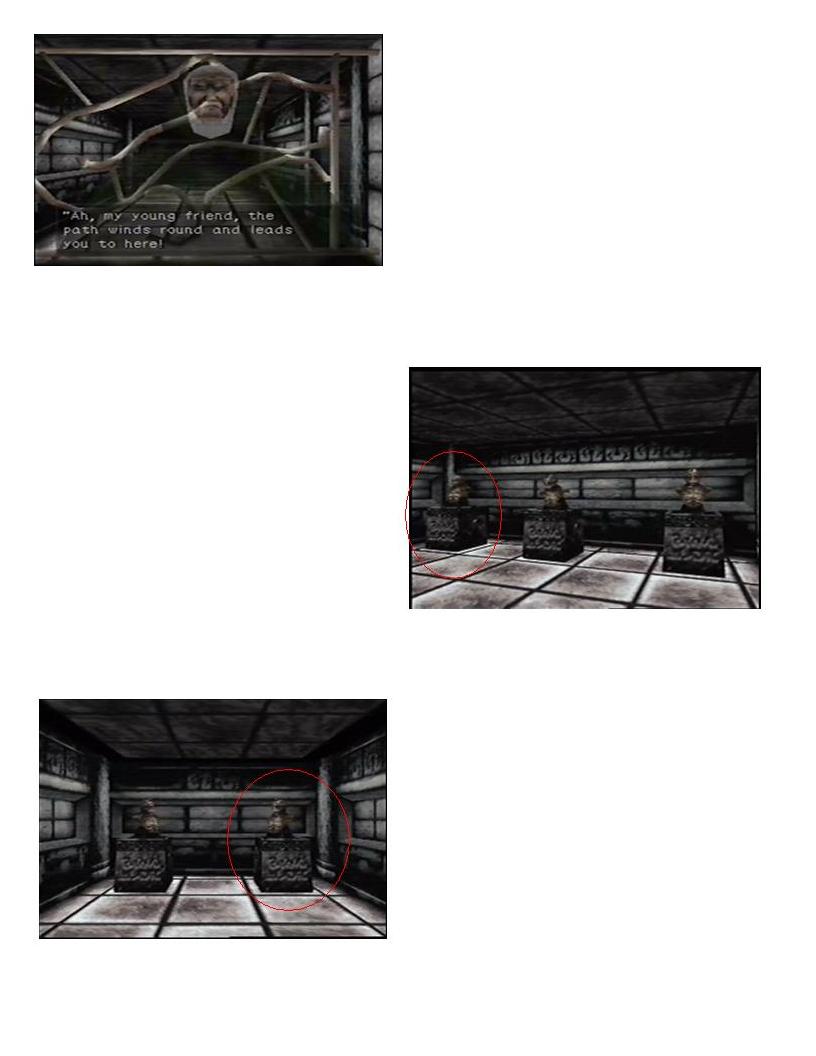
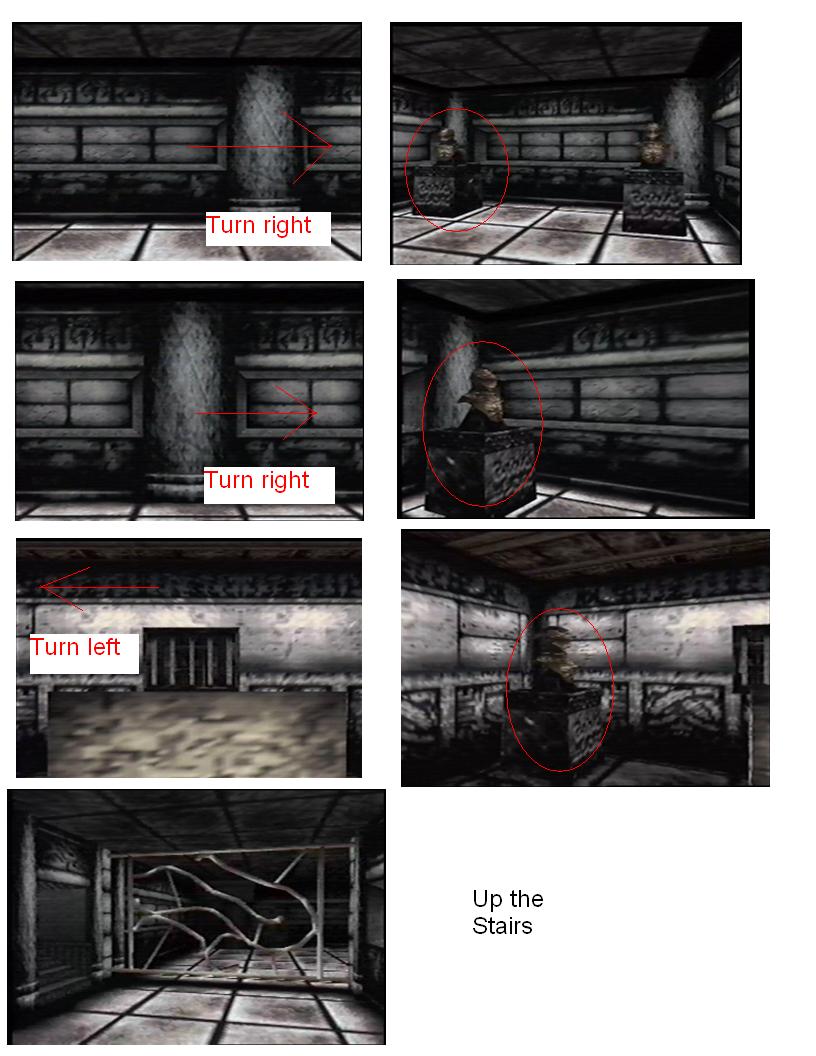
end of the maze. The statue on your left now will
take you back to the beginning, but, turn to your right, and head up those
stairs.
Head forward, and you'll see two doors opposite each other. Go in the one on
the left first. On the left, you'll see a strange-looking machine. Go up in
front of the opening, and select the Nail from your inventory. You'll toss it
in the opening, the machine will go to work, and out the end will come the
Crest Key. On the wall opposite the machine is a shelf, and on the left side of
the shelf is a bottle of Forest Nectar. Head out of the room, and into the door
across from you. In this room on the left is a shelf, and on the left of the
shelf is a bottle of Night Elixer. On the right part of the shelf is a Quill.
Now turn around and go to the other side of the room, around the shelf, and
you'll see a bed. Walk onto the bed and look at the shelf, and you'll see a
bowl on top of the shelf. Go into your inventory and select the Night Elixer to
pour it into the bowl (make sure you're close enough to the bowl, otherwise
you'll drink it instead). Then, select the Liquid Sunset from your inventory to
pour that into the bowl as well. The combination will create a heavy steam,
which will cause a number of stars to be illuminated on the ceiling.
Get down off the bed and around the shelf, to the middle of the room where
there's a chair on the floor. Walk over to the chair to stand on it, and then
look up at the ceiling where you'll see a star with a hole in the middle of it.
While
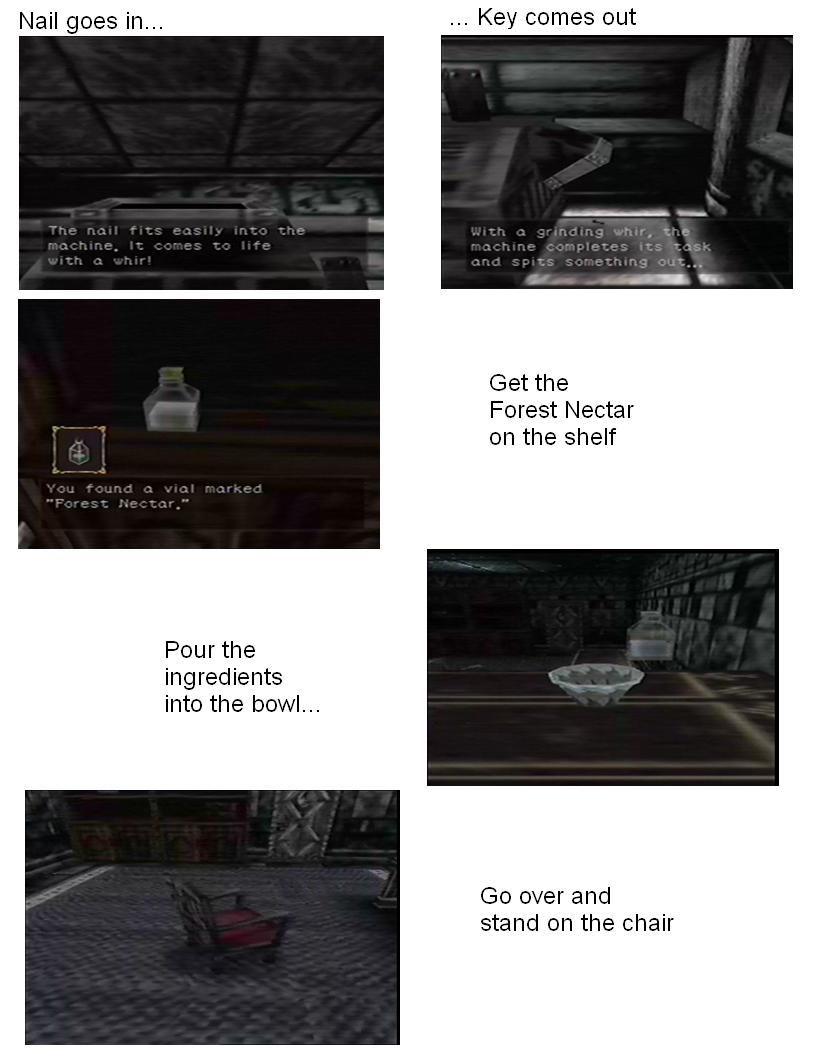
looking at the star, go into your inventory and select the Crest Key to
insert it into the hole, unlocking the door in the room. Get down off your
chair and go through the door to the right of the shelf.
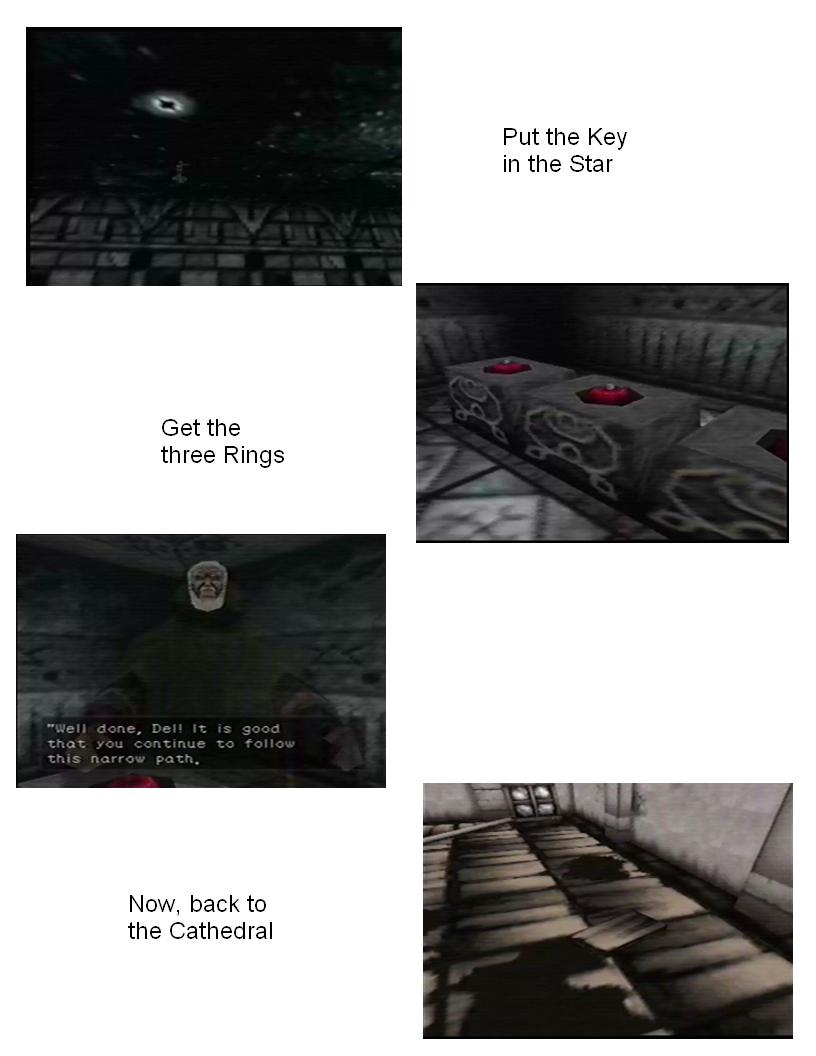
You'll find yourself in a room with three pedestals with three rings on them.
The ring on the left is The Blue Ring. Selecting this ring from your inventory
and putting it on will cause you to feel strange and your movement controls
become backwards (which, believe it or not, will actually be useful shortly).
Select the ring from your inventory again to remove it. The ring on the far
left is The Green Ring. Putting this ring on kills you instantly (and, no,
that's never going to be something you want to do), so, don't put that on. The
ring in the middle is the main reason you're here though. As soon as you take
the ring, Lakmir appears and explains to you about the ring, and also shows you
some stuff that's going on around you. The ring you have found is The Ring of
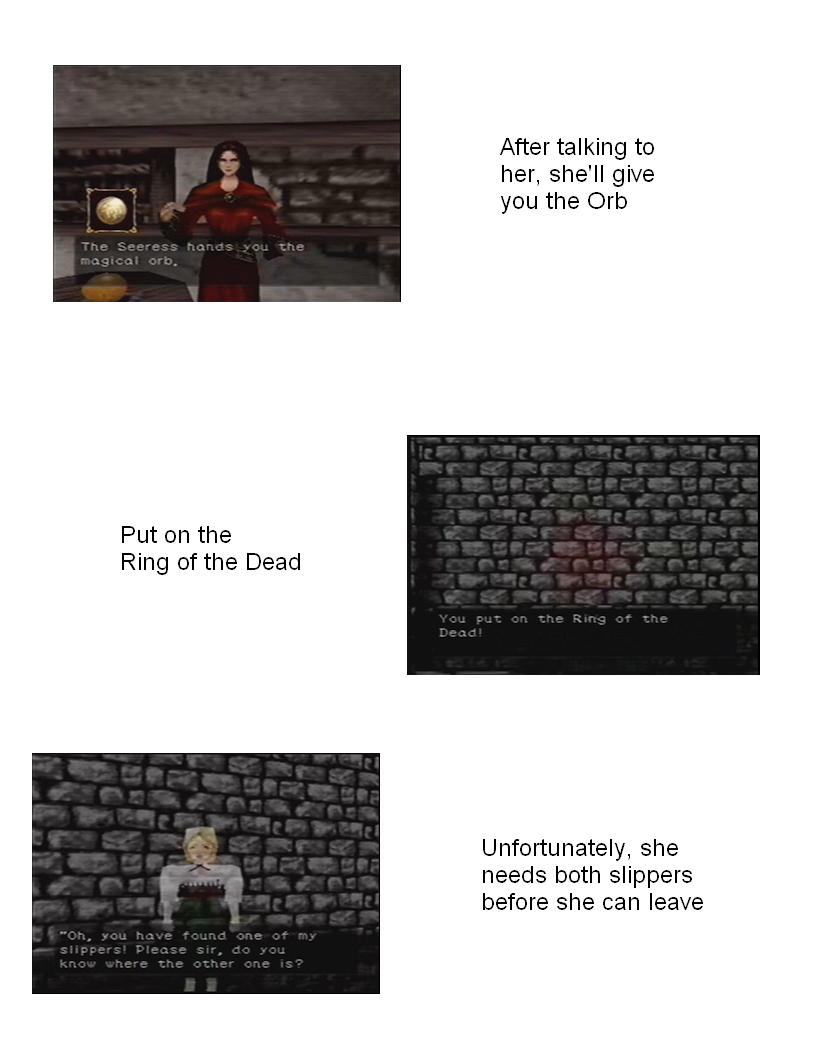
the Dead. Putting it on allows you to talk to any dead people or ghosts you
might run into, as well as read any blank books you might've come across. With
it on, however, live people won't understand you, so, you'll want to take it
off again if you're not using it.
Now that you have The Ring of the Dead, it's time to do a bit of backtracking,
all the way back to the Cathedral. Turn around and leave the room, turn to the
right and go through that door, turn to the left and go forward and down the
stairs, turn to the right and touch the statue, go through the door in front of
you, turn to the left, go forward and through the rusty door, up the stairs in
front of you, through the door in front of you, either left or right and up the
stairway and through the door at the top, up the stairs, forward a bit and then
through the door on your right, and then through the window in front of you.

4.06: Cathedral/Cemetery/Cave/Disciples' Tower
Items you can get here now: Jezibel's Pendant, Cemetery Key, Slipper
You're back on the roof of the Cathedral now. Make your way across to the open
passageway and down, and then forward and down the ladder. Turn to your left,
go forward, around the seats in front of you, under the overhang, and down the
stairs. Turn to your right, go forward a bit, and there will be a door on your
right to go through. In this room will be two coffins, the left one is empty,
but the right one is locked. Go up to the keyhole and use the Golden Key from
your inventory to unlock it. Press A to open the coffin. Select The Ring of the
Dead from your inventory to put it on, and you will be able to talk to the
woman in the coffin. She'll tell you her story, and at the end she'll give you
Jezibel's Pendant. Go out the door, left, and back up the stairs. Go forward,
around the seats, and out the door. Turn to your left and go forward, and at
the end turn to your left to see a bunch of boards blocking your way, and press
A to remove them. Go forward, with The Ring of the Dead on, to talk to the
person at the grave. Once he's done talking, select the Dragon Tears from your
inventory to pour some on the grave. Press A and the man will appear again,
thank you, and teach you some words that you'll need later on (you don't have
to actually remember the words, just having spoken to him and heard them,
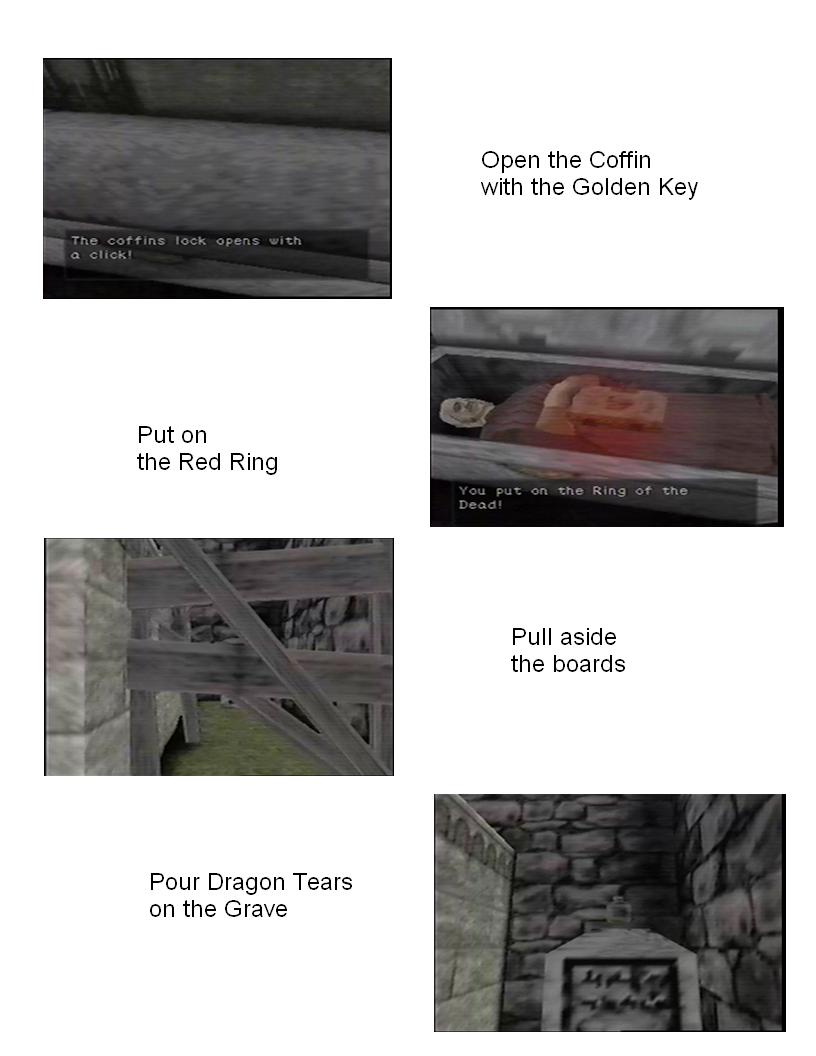
you'll use them automatically when you need to).
From here, go back into the church, to the right, under the overhang, and back
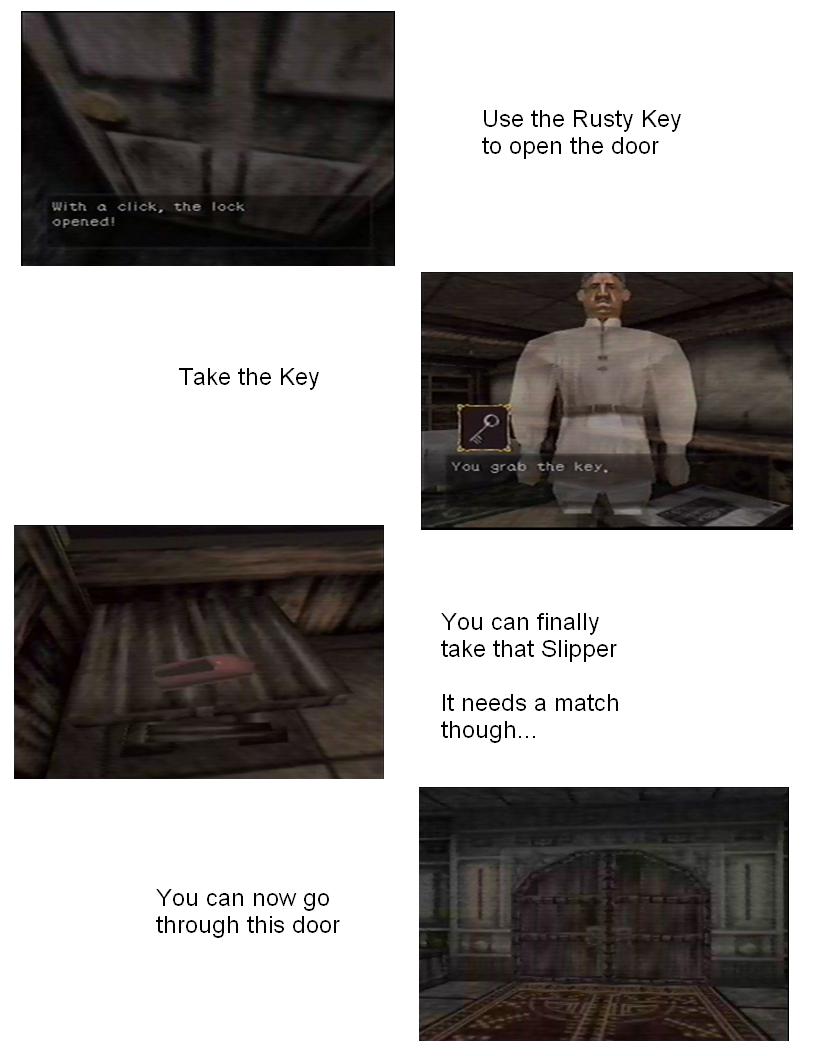
down the stairs. Turn right, go forward, down the stairs, and use the Rusty Key
on the door. You're now back in the Cave area. Go right, forward, up the stairs
to the door, and use the Rusty Key on the door. You're now back in the
Disciples' Tower. Go forward, through the door, turn left, go forward, and go
in the door on your left. Turn to the right and, making sure you have the Ring
of the Dead on, go over to the beds near shoe on the table. As you approach, a
man will appear and tell you about the shoe and its owner. He'll give you a
key, the Cemetery Key, and you can also now take the Slipper from the table.
Go back out the door, turn right, go forward, turn left, go forward and up the
stairs, and forward through the door. Ahead of you, you'll see a large set of
double doors. Walk up to them, and you can now go through them and outside of
the tower.
4.07: Gate keeper's room/Street/Pathway to Park/Park/Waterway/Sorcerers Quarter
Items you can get here now: Coin, Orb, Poisonous Herb, Coin
Turn to your right and on the ground you'll see a Coin. Turn back around and go
down the passageway in front of you into the Street. Go forward, left, right,
put on Jezibel's Pendant, and go into the door on your left. When you go in,
the Innkeeper will talk to you and ask where you got the pendant. When he asks
if you're a grave robber, say no. He'll then ask you some questions about
Jezibel to see if you're telling the truth. If you paid attention to her before
you'll know the answers, but if not, here they are. What's the name of Saul's
friend: Lucas. What was Saul hoping to find: Gold and gems. How long after he
left did the poor woman die: A fortnight. If you answer any of them wrong,
he'll send you back out of the inn, but you can just go back in and try again.
Once you've answered all of his questions, he'll finally believe you, and let
you come in.
After talking to him, you'll be pointed over at a woman in the corner. Go over
and talk to her, and you'll learn that she's Agaar's sister (Agaar was the guy
in the cell next to yours when you first started), and that she wants you to
save him. Say you'll help her, and she'll give you the Orb.

After speaking with her, leave the inn and go straight forward through the
doors in front of you, into the Pathway to Park. Turn left and go down the
pathway. You'll come to a bend to the right, and just after the bend, on the
ground you'll see a plant that looks a bit different from the others, it's the
Poisonous Herb. Continue along the path, and on your left you'll see a set of
doors. Go through them into the Park. Walk up to the pond with the statue in
front of you, and Lakmir will appear again and give you some more information.
After he finishes, put on The Ring of the Dead, turn right, and head under the
arch into the Waterway. Go forward (but not into the water) and press A, and a
little girl will appear. She'll say that she needs her other shoe before she
can leave. Turn around and head back into the park, to the left and through the
door back into the Pathway to Park, turn left and continue down the path. Just
before the door at the end, look to your left and on the ground you'll find
another coin. Continue on through the door into the Sorcerers Quarter. Head
forward, turn right, go down the path and through the door at the end, into the
Excavation Area 1.
4.08: Excavation Area 1/Sorcerers Quarter/Pathway to Park/Park/Waterway
Items you can get here now: Artwork, Slipper (Pair of Slippers)
When you first enter the Excavation Area 1, go forward a bit, and then turn
right around the corner of the house. In the door on the first floor is a man
who will talk to you a bit. Once you're done with that, go up the stairs by the
door. Turn to your right and you will see an Artwork on the side of the
bookcase that you can take. Go through the door to go back outside.
Now, go around the outside of the pit to where there's a ladder, and climb down
it. Turn to the left and you'll see a man. Go over and talk to him, and he'll
tell you he's looking for coins. Select the Ancient Coin from your inventory,
and he'll ask to take a look at it, and then run off with it. Go forward to the
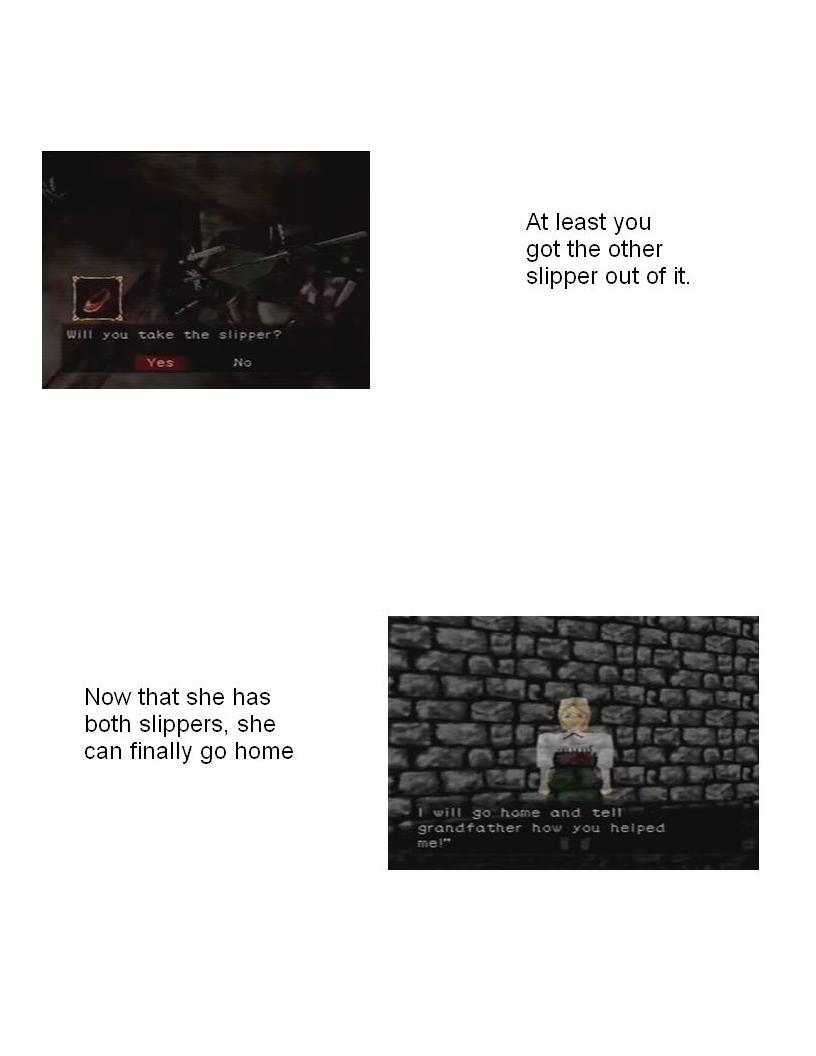
area where he was digging and press A, and you'll find a Slipper, the match for
the one Slipper you already had, giving you now a Pair of Slippers. Turn around
and go back up the ladder, left, around the pit, by the side of the house and
through the door into the Sorcerers Quarter. Forward and left through there,
and into the Pathway to Park. Go forward and into the door on your right into
the Park. Go right, under the arch, into the Waterway. Put in The Ring of the
Dead, go forward, and press A to talk to the girl. She'll take the Pair of
Slippers, and tell you she's heading back to her grandfather, which

is where you're going next as well.
4.09: Park/Pathway to Park/Street/Gate keeper's room/Disciples' Tower
Items you can get here now: Stone of Thirst
Turn back around and go back into the Park, left and through the door into the
Pathway to Park. Turn right and head down the path, turning left at the bend,
and then right and through the door into the Street. Go forward, left, left,
right and down the path, into the Gate keeper's room. Go forward and right
through the double doors, into the Disciples' Tower. Go left, through the door,
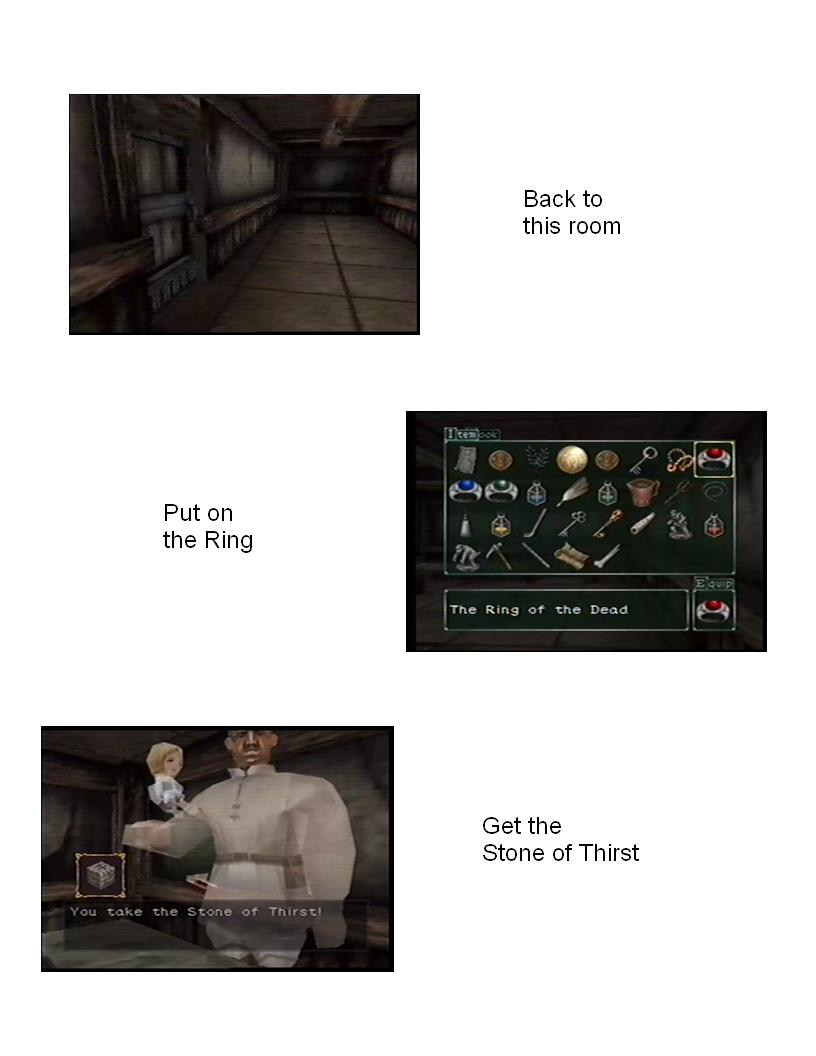
down the stairs, forward, right, make sure you have The Ring of the Dead on,
and go in the second door on the left. Turn to the right, go over by the beds,
and the grandfather and child will appear. He'll talk to you, and at the end,
he'll give you the Stone of Thirst.
4.10: Disciples' Tower/Gate keeper's room/Thieves' Room
Items you can get here now: Precious Stone, Plate, Flower
Head back out the door, right, left and up the stairs. Through the door at the
top of the stairs, forward and through the double doors into the Gate keeper's
room. Go forward, and through the door on the left wall, into the Thieves'
Room. Go forward, left, and up the stairs. Go through the door in front of you,
left and over to the shelf, and on the bottom left of the shelf will be a
Precious Stone. On the right part of the shelf will be a Plate. Go back out the
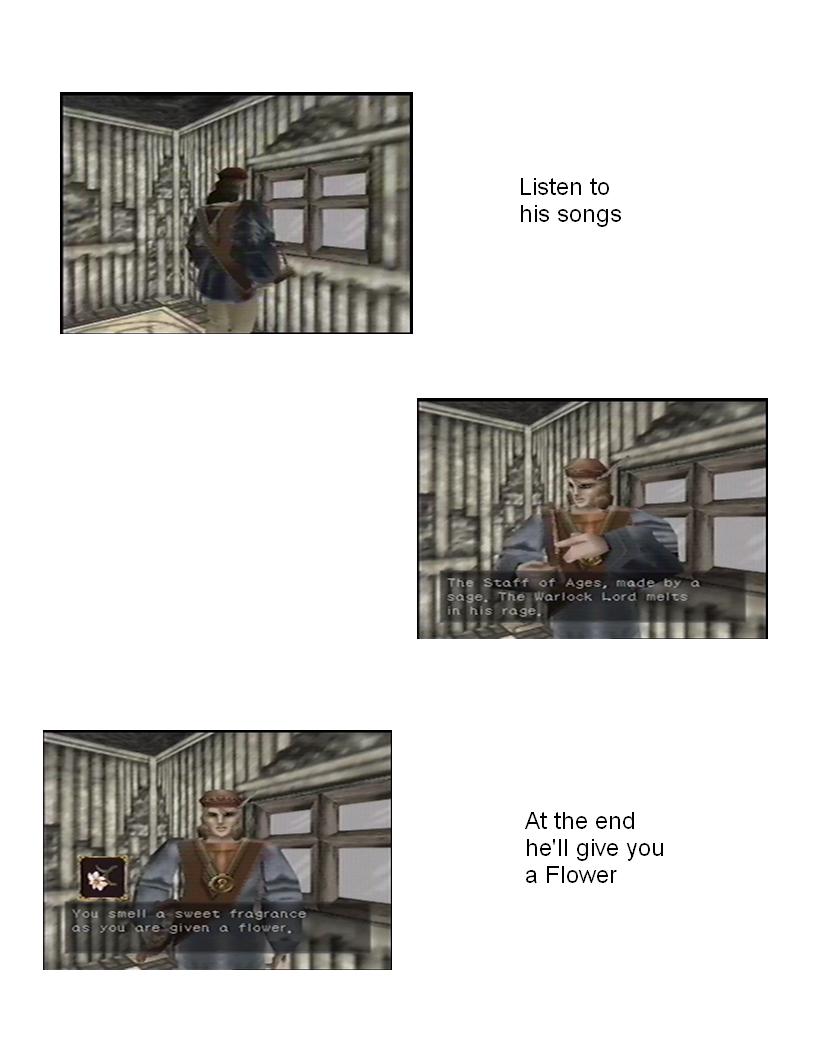
door, right and through that door. In this room will be a man you need to talk
to. Go up to him and he'll ask if you'd like to hear a song. Say yes and he'll
play for you, and when he's done he'll ask if you'd like to hear another. Keep
saying yes until he's done, and at the end he'll give you a Flower. Once you
have it, go back out the door, right and down the stairs, forward, right, and
out the door back to the Gate keeper's room.
4.11: Gate keeper's room/Street/Cathedral/Cemetery
Items you can get here now: None
Turn left, go forward, turn right before the door and down the pathway to the
Street. Go forward, left, right, and go to the door in front of you. Use the
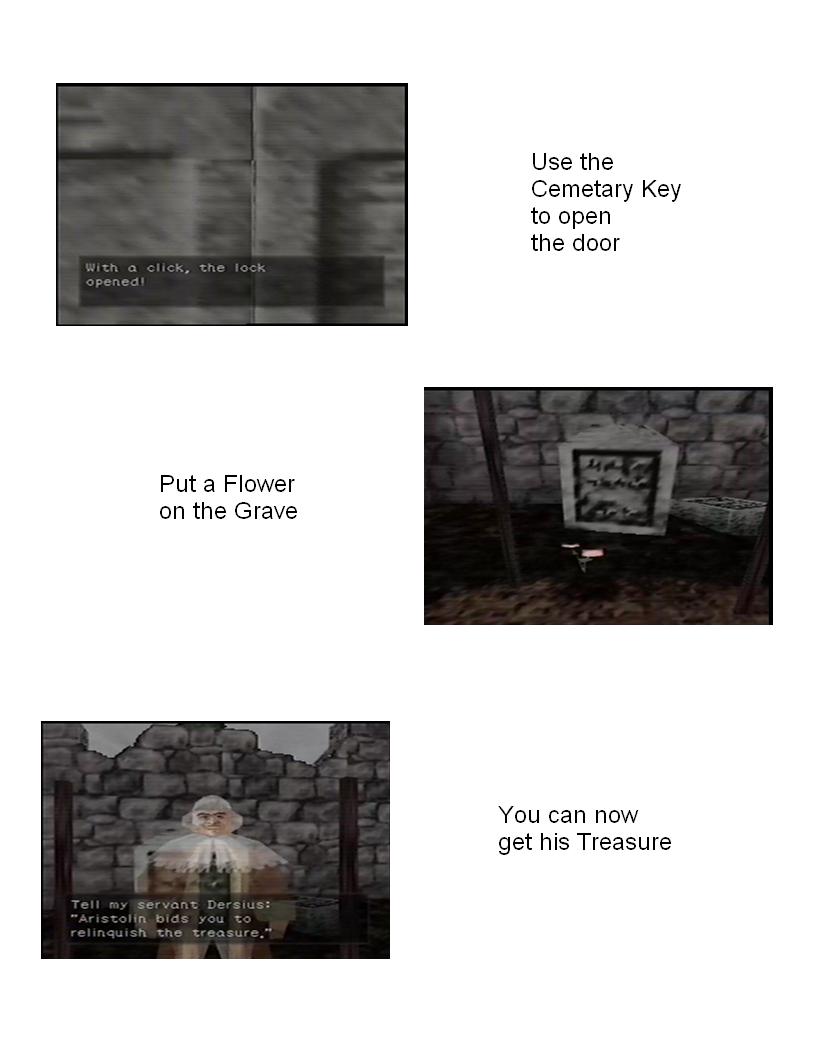
Cemetery Key to unlock it, and head through into the Cathedral. Go left,
through the door, and into the Cemetery. Make sure you have The Ring of the
Dead on, and go left, down the path, to the last gravestone on the right. Press
A in front of it to talk to the man there. Once you've talked to him, go into
your inventory and select the Flower to place it on the grave, and press A to
talk to him again. He'll tell you to go and find his treasure, and that you can
have it.
4.12: Cemetery/Cathedral/Cave/Drain
Items you can get here now: Treasure
Turn right and head back down the path, through the door on the right and back
into the Cathedral. Go through the door on the left to go inside. Go right,
under the overhang, and down the stairs. Turn right, go forward, down the
stairs and through the door into the Cave. Go left, forward and through the
door. Go across the pillar and through the door, left and through the door, and
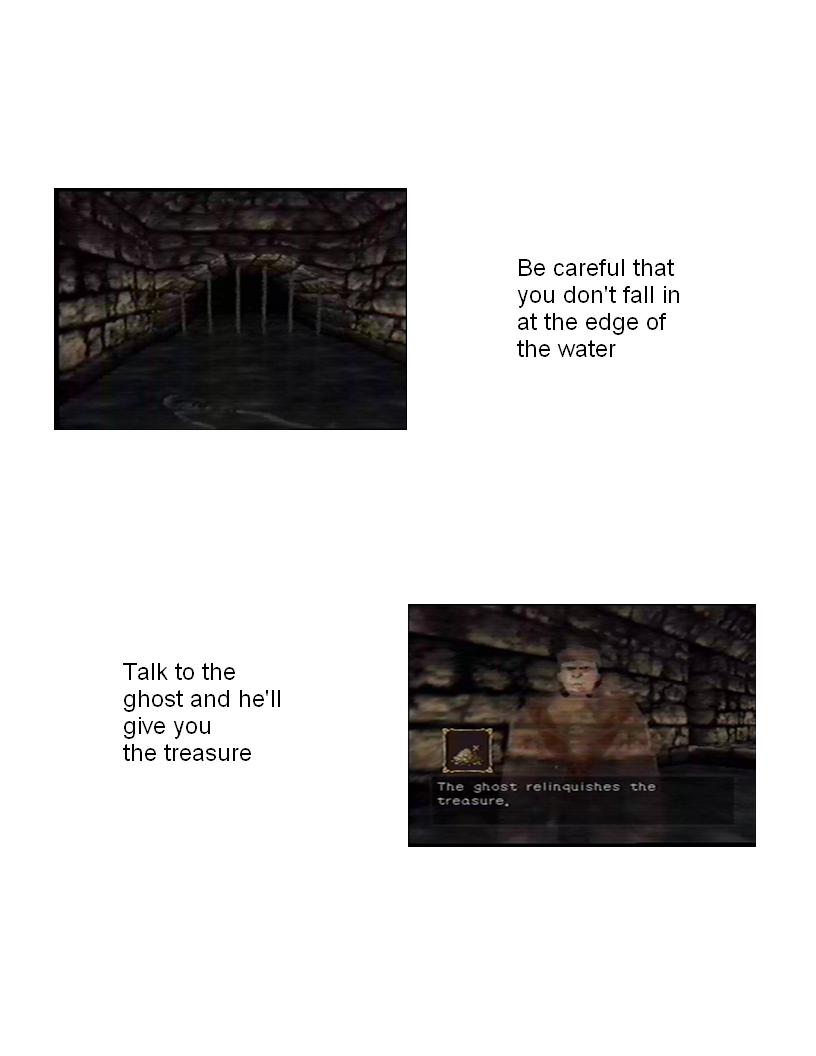
then turn right. Make sure you have The Ring of the Dead on, and go forward, to
the very edge of the path (be careful not to fall into the water at the end),
and press A. A man will appear, and give you the Treasure.
4.13: Drain/Cave/Cathedral/Street/Gate keeper's room/Thieves' Room/Dungeon
Items you can get here now: Chipped Violin, Dungeon Key
Turn around and head back down, through the second door on your left. Through
the next door, across the pillar, through the door, left, and through the door
on your right into the Cathedral. Go up the stairs, forward, left, and up the
stairs. Forward, right and through the door, and then through the door in front
of you into the Street. Go forward, left, and into the door on your left into a
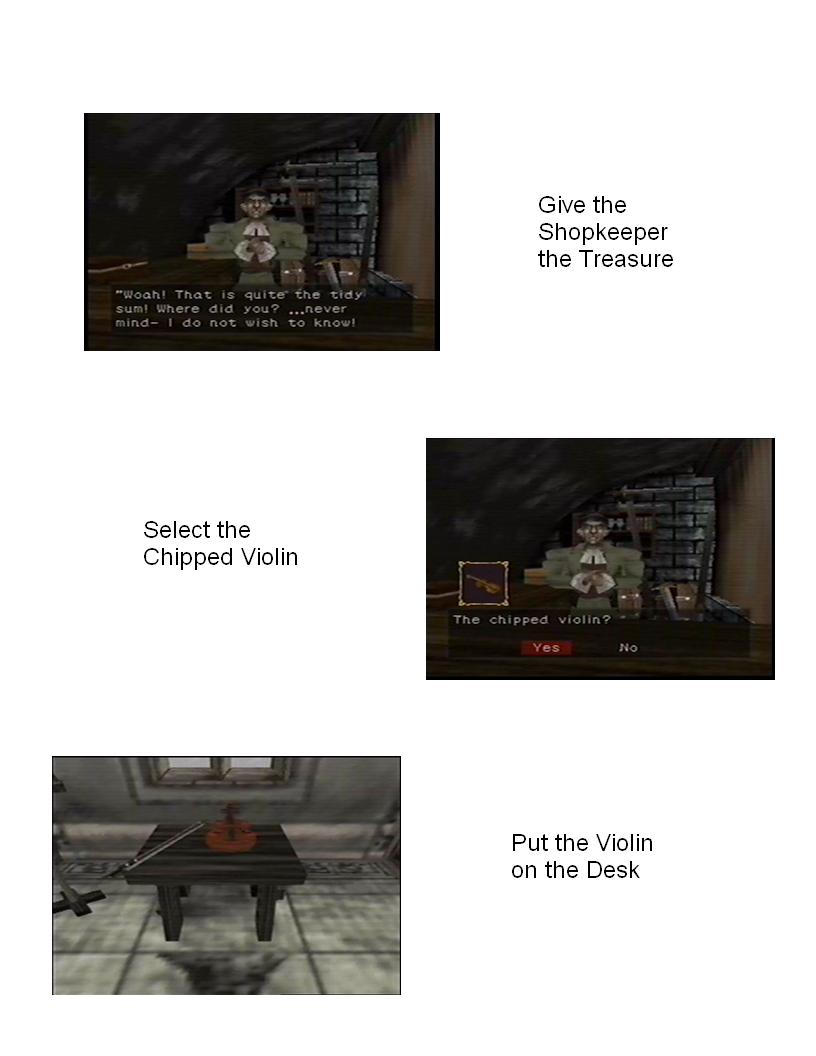
shop. Talk to the shop keeper, and then use your Treasure. He'll give you a
choice between three violins, and you'll want to pick The chipped violin (if
you pick the wrong one you can talk to him again to exchange it). Go back out
of the shop, forward, left and right into the Gate keeper's room. Go forward,
left, and through the door on the left wall into the Thieves' Room. Go forward,
left, and in the right door. Be careful because if the dungeon keeper notices
you, he'll kill you. Walk into the middle area, to the right of the door, and
walk over to the desk. Select the Chipped Violin from your inventory to place
it on the desk, and then quickly run back and to the right around the other
side of the wall. Once the dungeon keeper goes over and starts playing his
violin, walk forward, left, past him and around the other side of the shelf.
On
the wall you will see a key rack, and there will be a Dungeon Key on one of the
hooks. Continue down the path and take the stairs, and you will be in the
Dungeon. Go forward and right and you'll see two rows of cells, two on each
side. Go to the first door on the right and use the Dungeon Key to open the
door, and then go in and talk to Agaar. While you're talking, the dungeon
keeper will come up and shut the door, locking you both in. Turn back to Agaar
and select the Orb from your inventory. He'll use it to send both of you out of
the cell, and the dungeon keeper in. Once you're outside, turn back to the cell
door and use the Dungeon Key to lock the door. Turn to the right, go forward,
left, right, and up the stairs to get out of the dungeon.

4.14: Thieves' Room/Gate keeper's room/Street/Pathway to Park/Sorcerers
Quarters/Agaar's Room
Items you can get here now: Flint, Lever, Fang
Go forward, right, and through the door on the left. Turn left, go forward,
right, and out the door to the Gate keeper's room. Turn right, go forward,
right, and down the passage into the Street. Go forward, left, right, and into
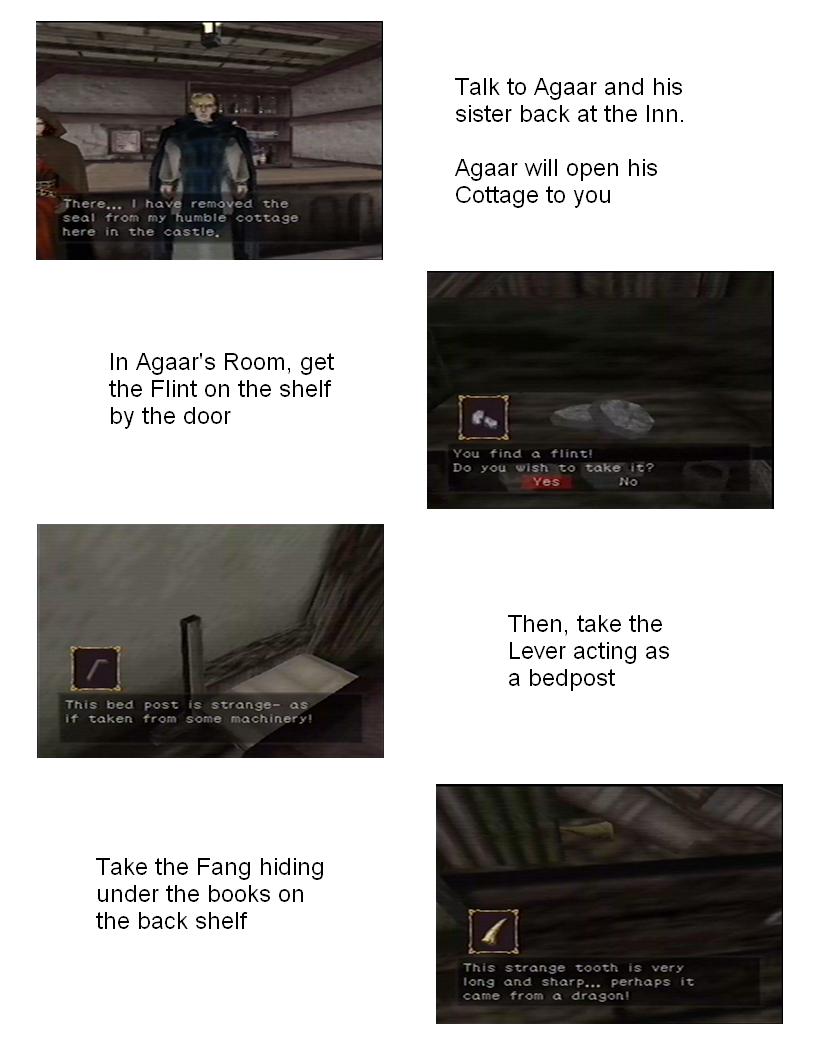
the door on your left into the inn. Agaar will thank you for saving him, and
unlock his room for you, and then he and his sister leave. Go back out the
door, to the right and through the doors into the Pathway to Park. Left, right,
and through the door at the end of the path to enter the Sorcerers Quarters. Go
forward, right, right, and through the door on your right to enter Agaar's
Room. Here, turn to the left and you'll see a book case. Walk over to it, and
on the top shelf you'll see a piece of Flint. Turn around and you'll see two
beds. The back left part of the second bed is actually a Lever, so take that.
Then turn around and you'll see another book shelf against the other wall. Go
over to that, and on the bottom shelf, on the left under some books, is hidden
a Fang. Having collected these three items from the room, go back out the door,
back into the Sorcerers Quarters.
4.15: Sorcerers Quarters/Excavation Area 1/Excavation Area 2/Reservoir
Items you can get here now: None
Turn left from the door and walk forward. Turn right at the end of the house,
and go through the door into the Excavation Area 1. Go forward and through the
door on the left wall into the Excavation Area 2. Walk forward and go down the
ladder to your left. Turn to your left and go through the passageway on the
left into the Reservoir.
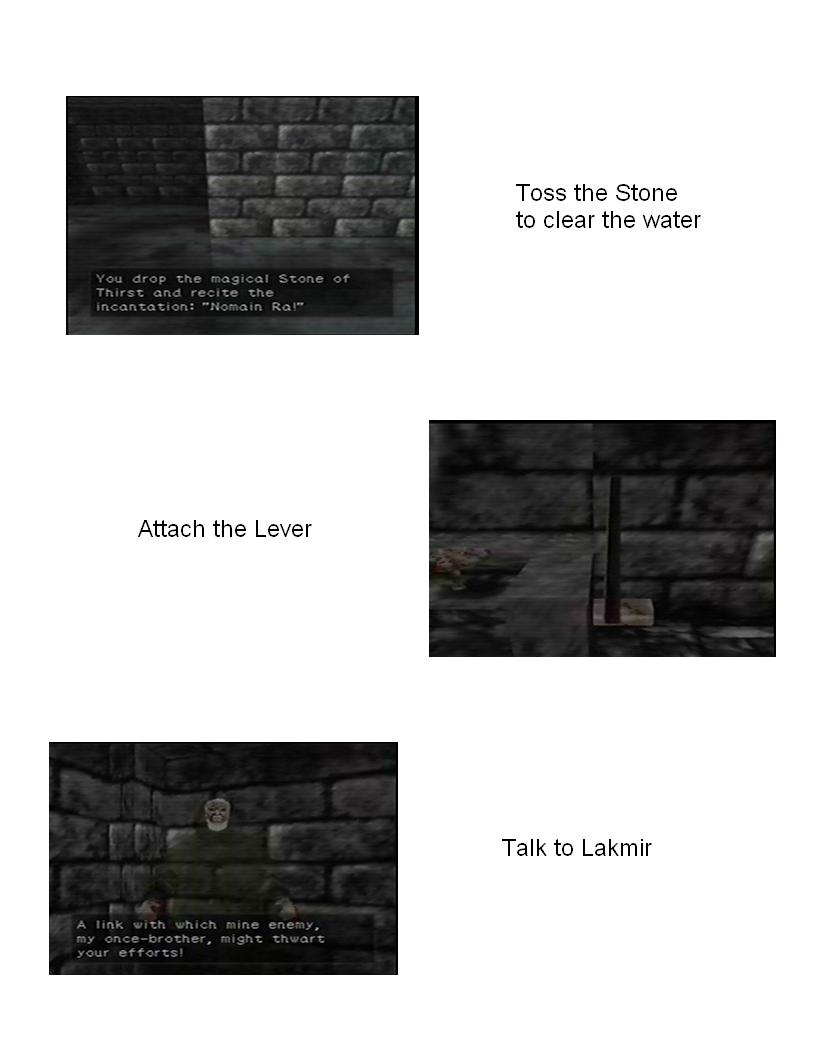
Walk up to the edge of the platform, and then select the Stone of Thirst from
your inventory. You'll toss it into the water, and the water will drain away.
Go down the ladder in front of you, and then head forward and go up the ladder
to your right. Head forward and to your right, and on your right you'll see a
machine with three knobs on the top, and over on the right side a turning
device. Go over to the device on the right and use the Lever from your
inventory to attach it, and you'll have a conversation with Lakmir again. Once
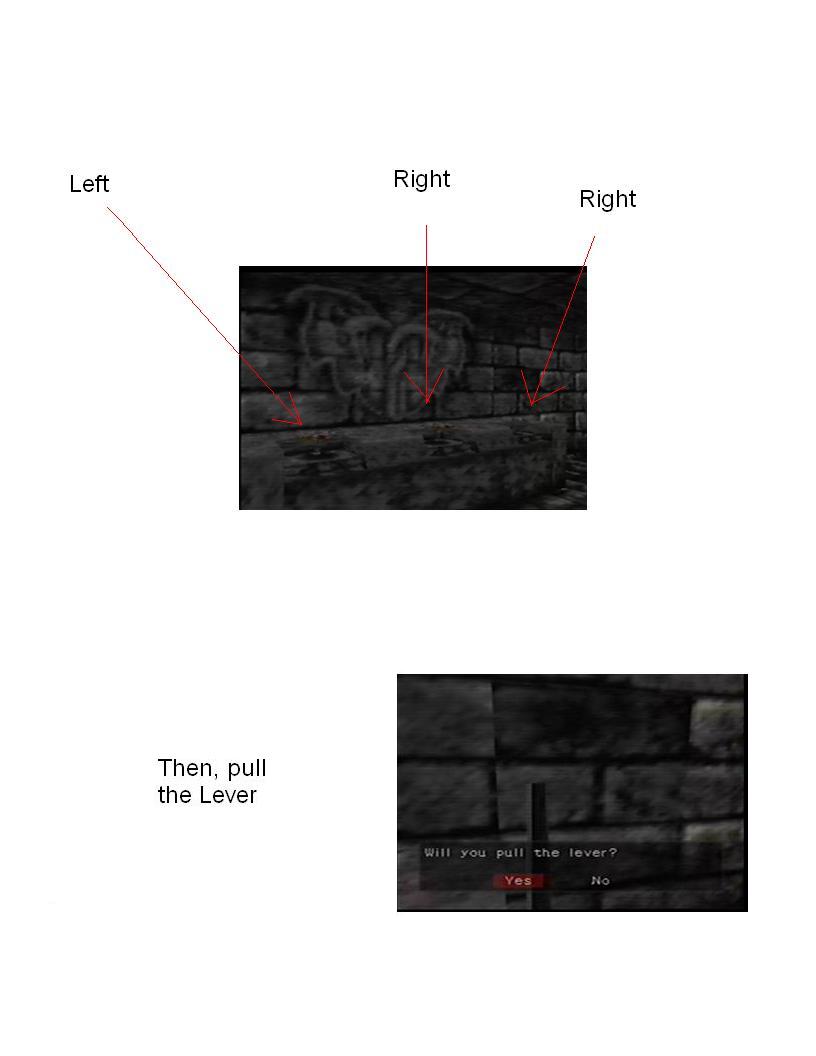
he's done, head over toward the knobs. Press A in front of a knob and you'll
have the option to turn it left or right. Turn the knob on the left to the
left, the one in the middle to the right, and the one on the right to the
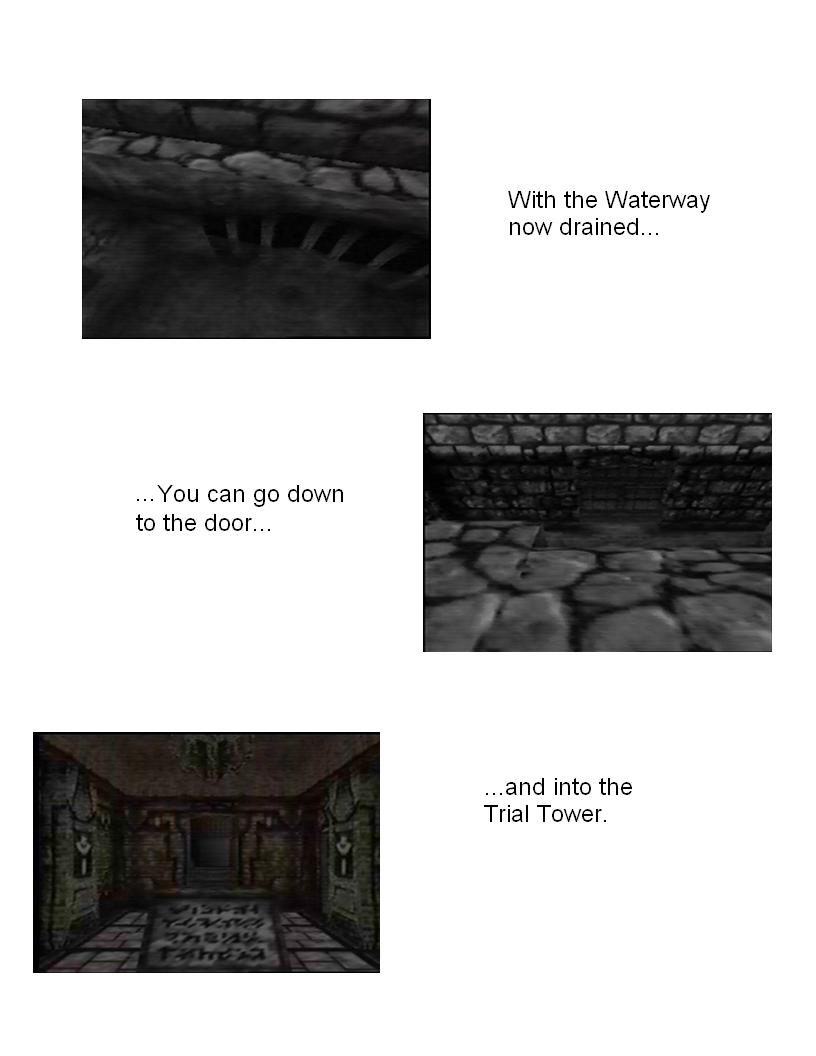
right, and then go over to the lever and pull it. Lakmir will appear again, and
show you where the water is draining from, which is where you'll be heading
next. Turn to the
right, and head back down the ladder you came up from, turn
left and go up the ladder on the right, and back out the passage into the
Excavation Area 2.
4.16: Excavation Area 2/Excavation Area 1/Sorcerers Quarters/Pathway to
Park/Park/Waterway
Items you can get here now: None
Turn left and head up the ladder in front of you, turn right and head forward
and through the door into the Excavation Area 1. Turn right and head forward,
through the door, to the Sorcerers Quarters. Head forward, left, and into the
Pathway to Park. Go forward and enter the door on your right, into the Park. Go
to your right and forward, into the Waterway. Head forward, down the stairs,
and through the door, to enter the Trial Tower.
4.17: Trial Tower
Items you can get here now: Fragments of a Crest, Burning Candle, The Ring of
the Kingdom
When you enter the Trial Tower, you'll see a plaque in front of you. Walking up
to it and reading it will explain what you have to do here, and once you've
read it, Lakmir will appear and elaborate further. Once he's done, head
forward, up the stairs, into the next room. There will be another plaque here,
explaining the task you must do in this room, "Pay homage to the king." As
Lakmir explained, the tests are being fiddled with a bit, so, go to the picture
in the back on the left, the one of Nathor Dreslin. Look down at the ground and
press A, and you'll find a switch, opening a door to the next room.
In this next room, the plaque tells you to "Complete the Coat of Arms." On the
table to the left of the door are the Fragments of a Crest, so walk over to
them and pick them up. Now, turn around and walk over to the opposite wall and
you'll see a door with a space for the pieces on it. Press A in front of it,
and a screen will come up for you to assemble the coat of arms. It will give
you a number of choices between a set of pieces, and you'll have to pick the
correct ones. A picture of the coat of arms was in a book you may have picked
up along the way. From the first set of two pieces, choose the one on the left.
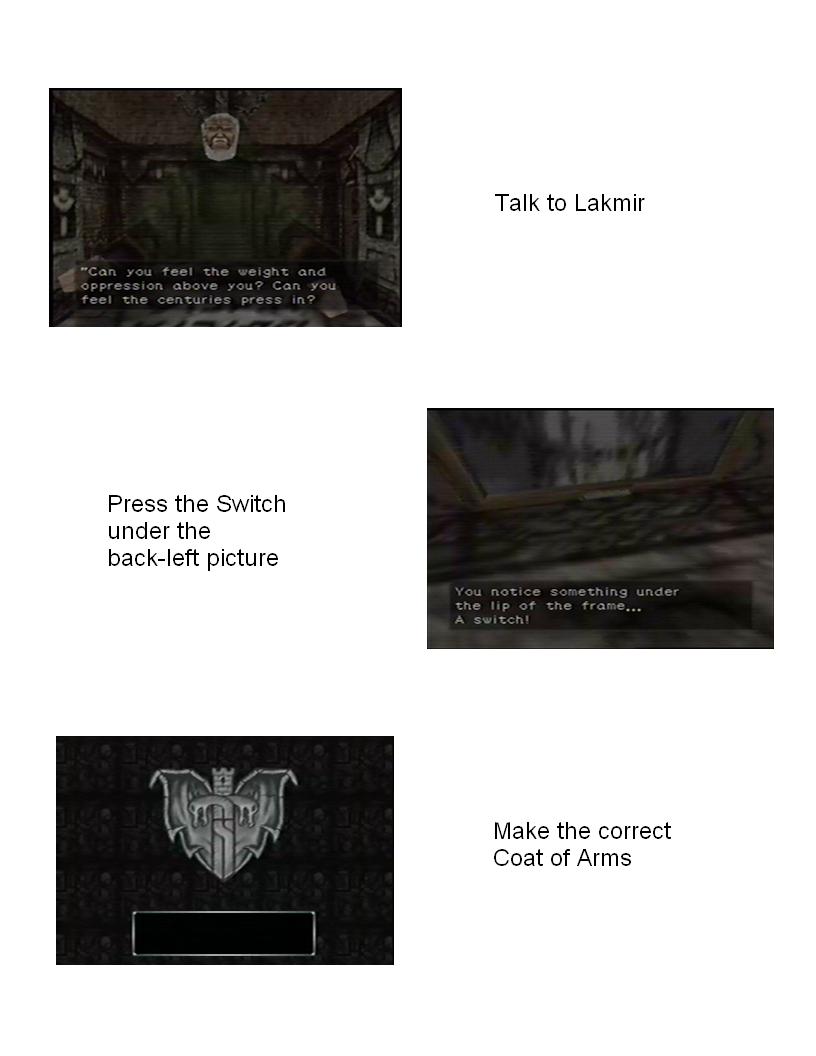
From the second set, choose the one on the very right. From the third set,
choose the one on the left. From the fourth set, choose the one on the left.
The screen will go away, and a door will open, leading to the next room.
In this room, turn to the left and you will see a wall with a face on it. Walk
over to it, and it will ask you questions. Each time you get one right, a wall
will lower. If you get one wrong, you'll be sent back to the very beginning of
the Trial Tower. You need to lower five walls to progress.
Here are the questions the wall may ask.
Does the Royal Family's Dragon
scream?: No.
Who was responsible for the banishment of the Evil One?: The Staff
of Ages.
By what name does the master of Dersius go?: Aristolin.
For what
symbol is one given a sorcerous rank: The Ring of the Kingdom.
What is the
prohibition against black magic?: It taints the soul.
Who is the rightful king
of Kal Torlin?: Nathor Dreslin.
What type of magic is expressly forbidden?:
Death magic.
What was the name of the First Dragon?: Bolhalor.
Of what species
was the last dragon?: Gold.
After you have passed all of the walls, there will be a statue in front of you.
Walk up to it to be teleported to the next room. In this room, your movement
controls are all wrong, and so you'll have to try to navigate your way through
the maze without the controls you're used to. While you can do it that way if
you want, if you got The Blue Ring from the ring room, you can put that on
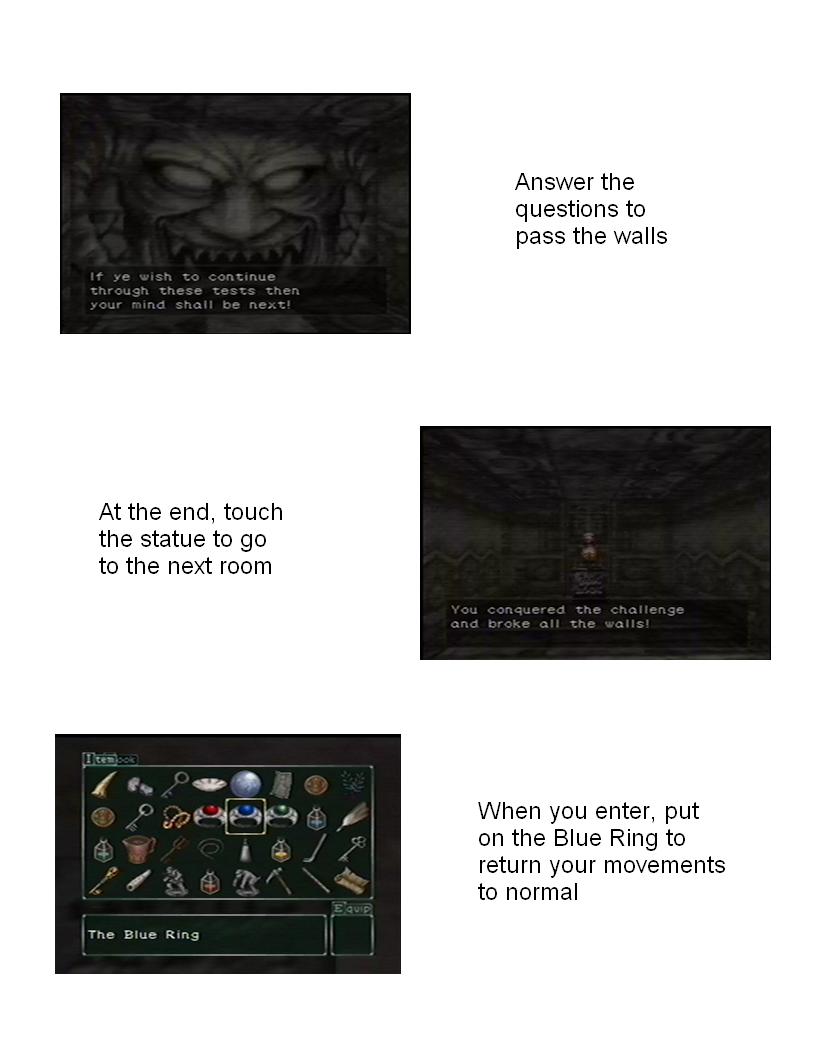
and
your controls will return to normal. You still have to be careful not to get
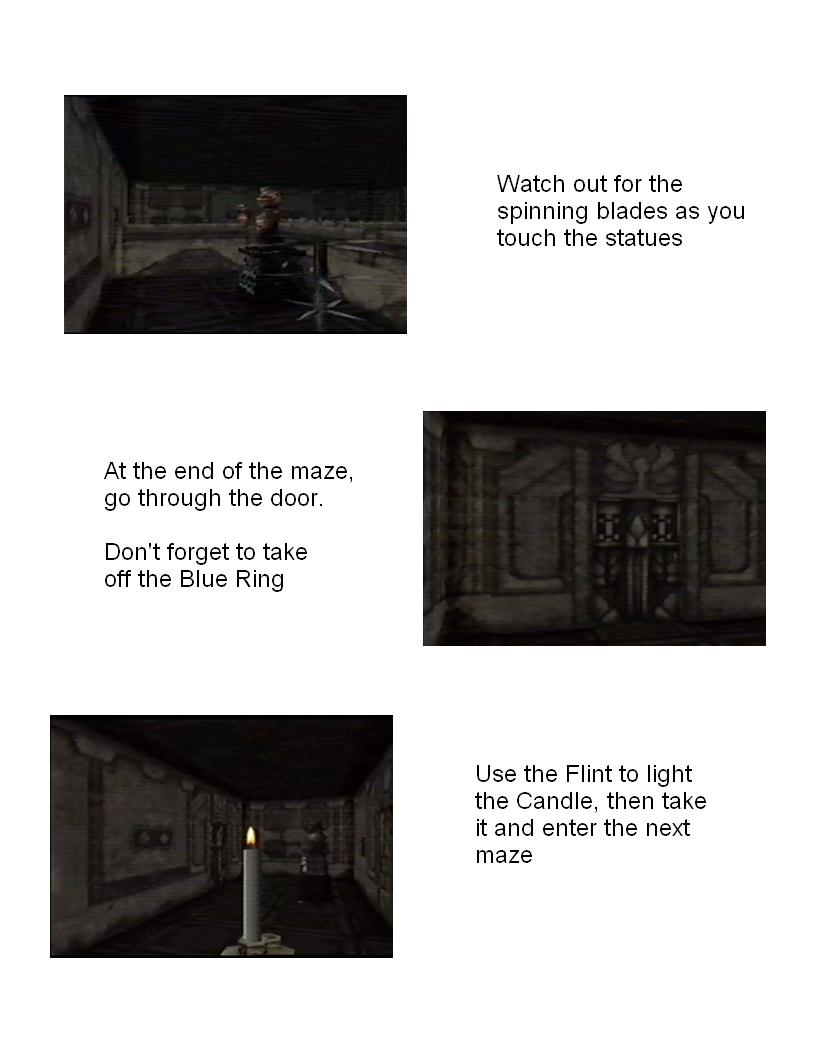
killed, but, it makes things much easier. From where you enter, turn right, go
forward, turn right, and touch the statue. Then, go around the spikes either to
the right or left and touch the statue in the middle. Now, go around the statue
in front of you, and down the pathway to the right, and touch the statue at the
end of that pathway. There will be a door in front of you, pass through it into
the next room (make sure to take off the ring if you put it on before so your
movement goes back to normal).
The sign in front of you will explain what you have to do now. To your right is
a candle. Go up to it and use the Flint from your inventory to light it, then
press A to pick it up. Go over to your left and through the door to enter the
maze. On the top right of your screen will be a picture of your candle, and
you'll have to make it through the maze before your candle burns out. If it
does, you'll have to go back to the candle room and try again.
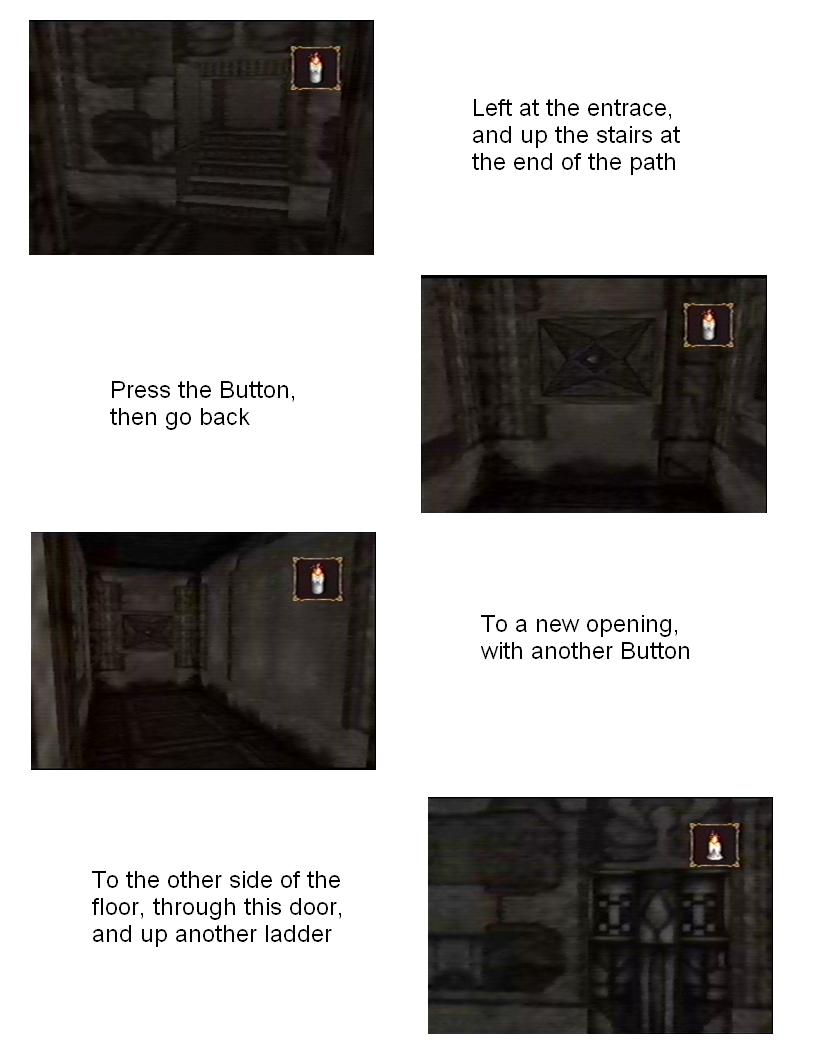
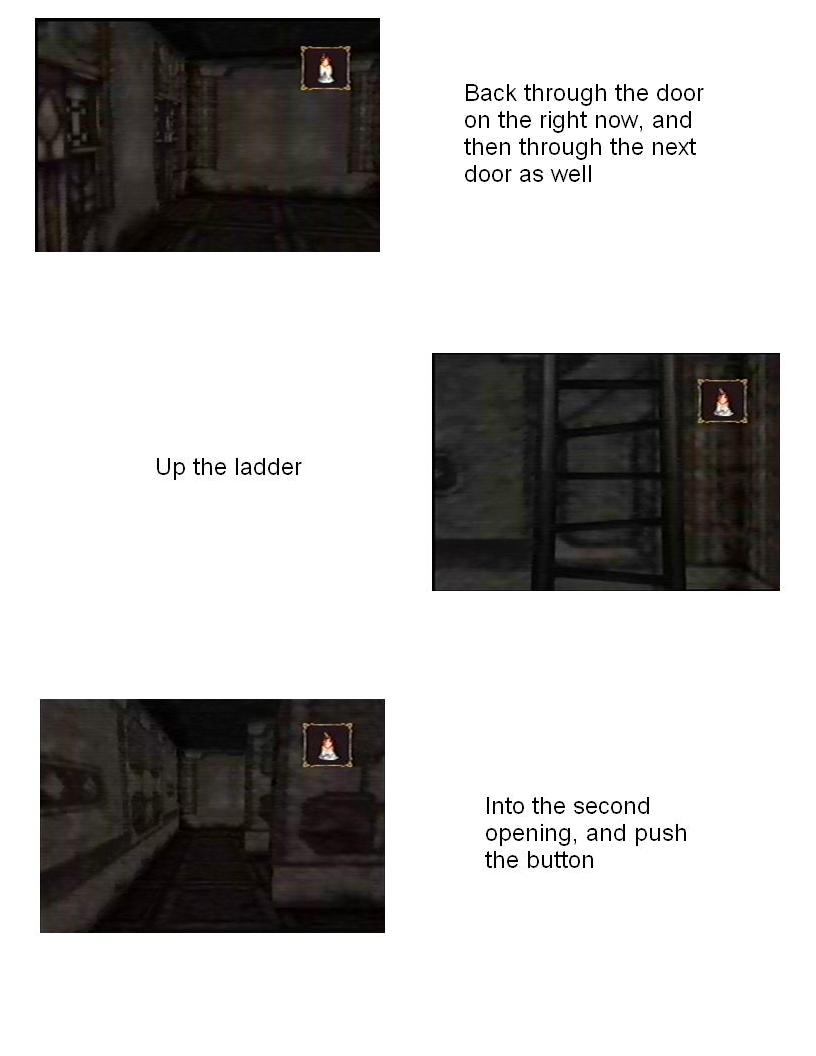
Once inside the maze, turn left, go forward, left at the bend, and up the
stairs at the end of the path. Go forward, right, left, and at the end of the
path turn left. You'll see a button at the end of the hallway. Go up to it and
press it, and then turn back around, down the path, around the wall (ignore the
door that opened there for now) and down that path, left, and just before the
stairs on the left you will see a new opening with another button. Go up to
that button and
press it. Now turn around, go back down the path, right, down
the path, and then through the opening on the right, forward, left, through the
door, and up the ladder. Turn to your right, go forward, turn to your left, go
forward slightly and you'll see two openings on your left. Go into the first
opening and push the button, then turn around, go out of the opening and to the
left, and down the ladder. You'll see a door in front of you, but turn to the
right and you'll see another door. Go through the door on the right, and then
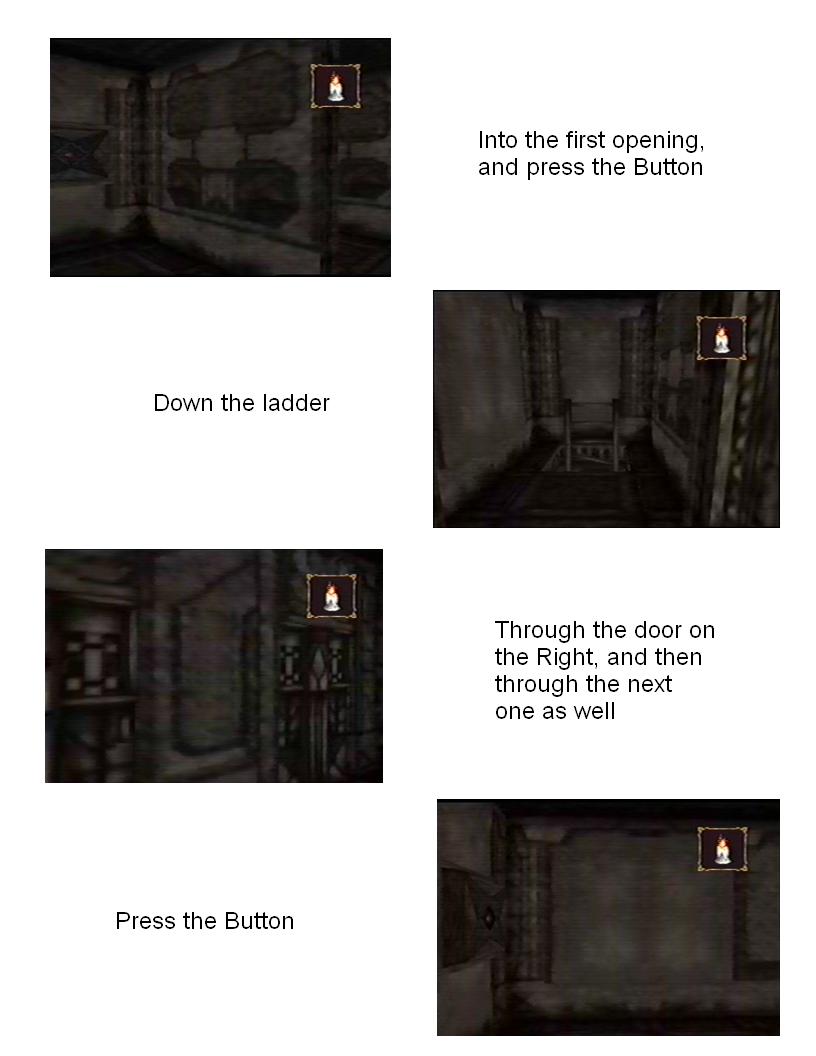
through the next one. Turn to your right and you'll see a switch, go up to it
and press it. Turn back around to where the door you came from was, but return
through the door on the right, and through the next door, and up the ladder. Go
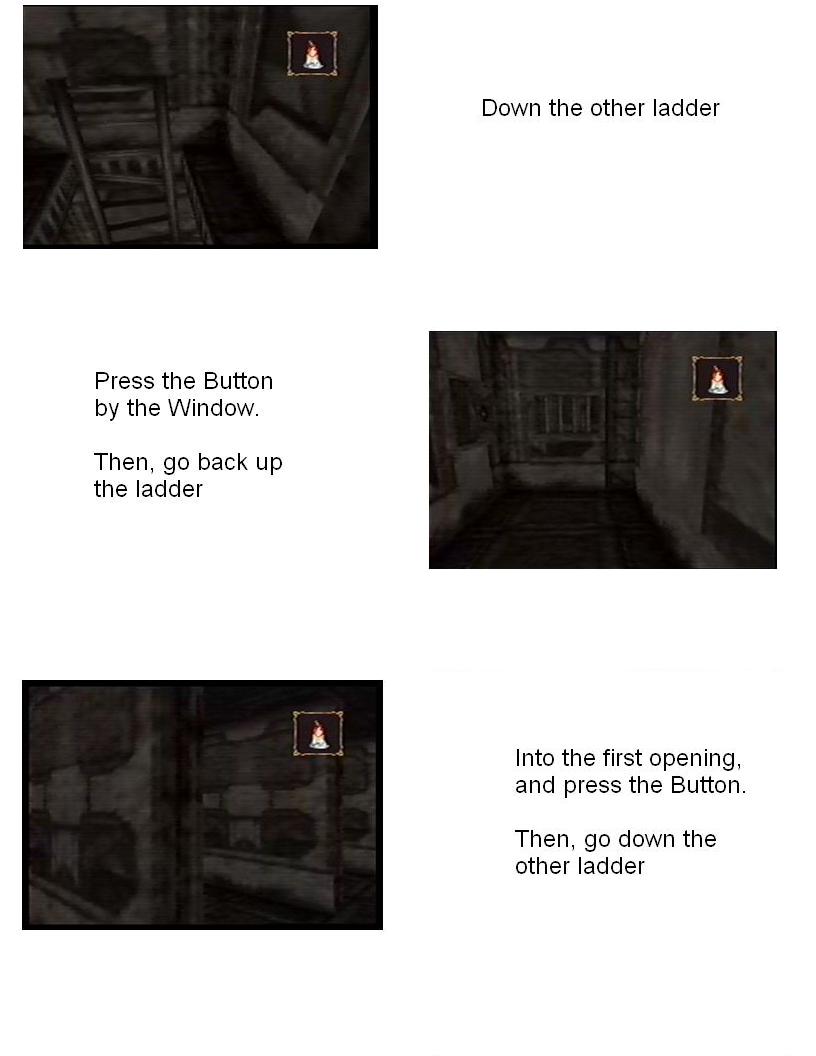
forward, into the second opening on the right, and push the button. Turn
around, head out of the opening, and turn right. Go forward, left, left, and
down the ladder. Go forward, turn right when you reach the door, to the end of
the path and press the button on the left. Turn back to your left, back down
the path, left, and back up the ladder. Turn right, go forward, left, and into
the first opening on the left and press the button. Turn around, go out, turn
left, and go forward and down the ladder. Turn to your right and go through the
right door, and then through the next door. Turn right, go forward, right, and
up the stairs. Walk forward, to the candle holder, and select the candle from
your inventory to place it in the holder. Go through the door in front of you
into the next room.
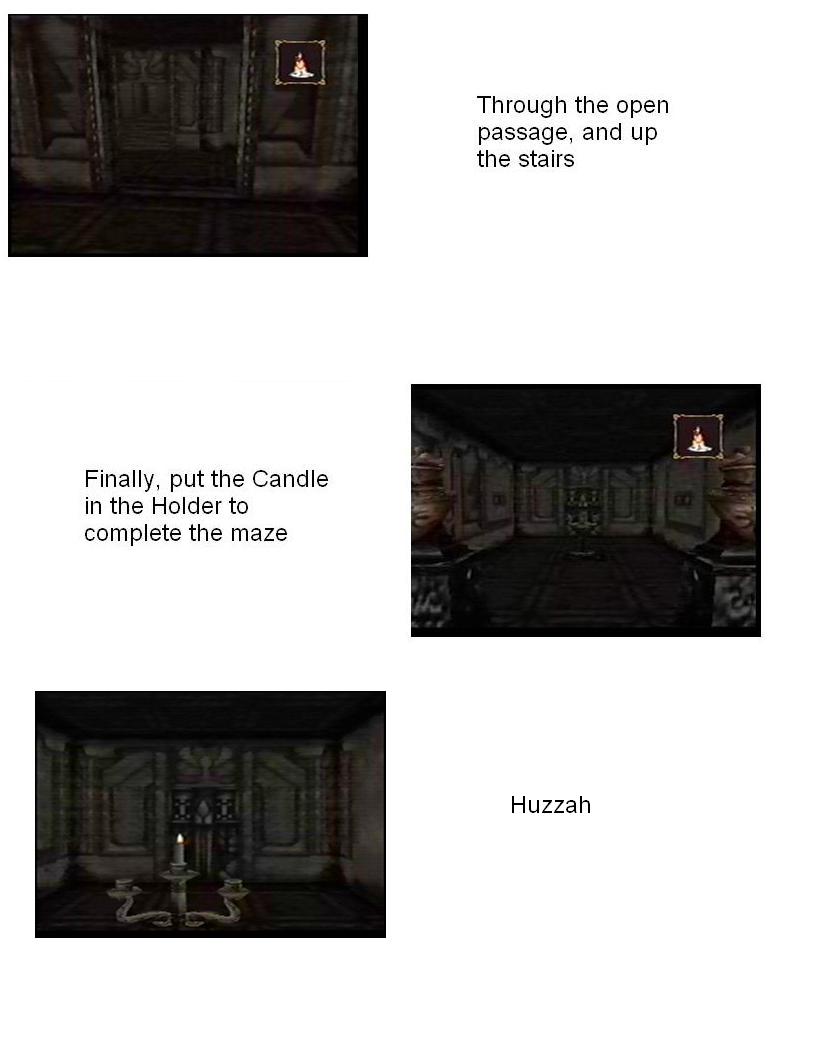
Turn to your right and go forward, and there will be a
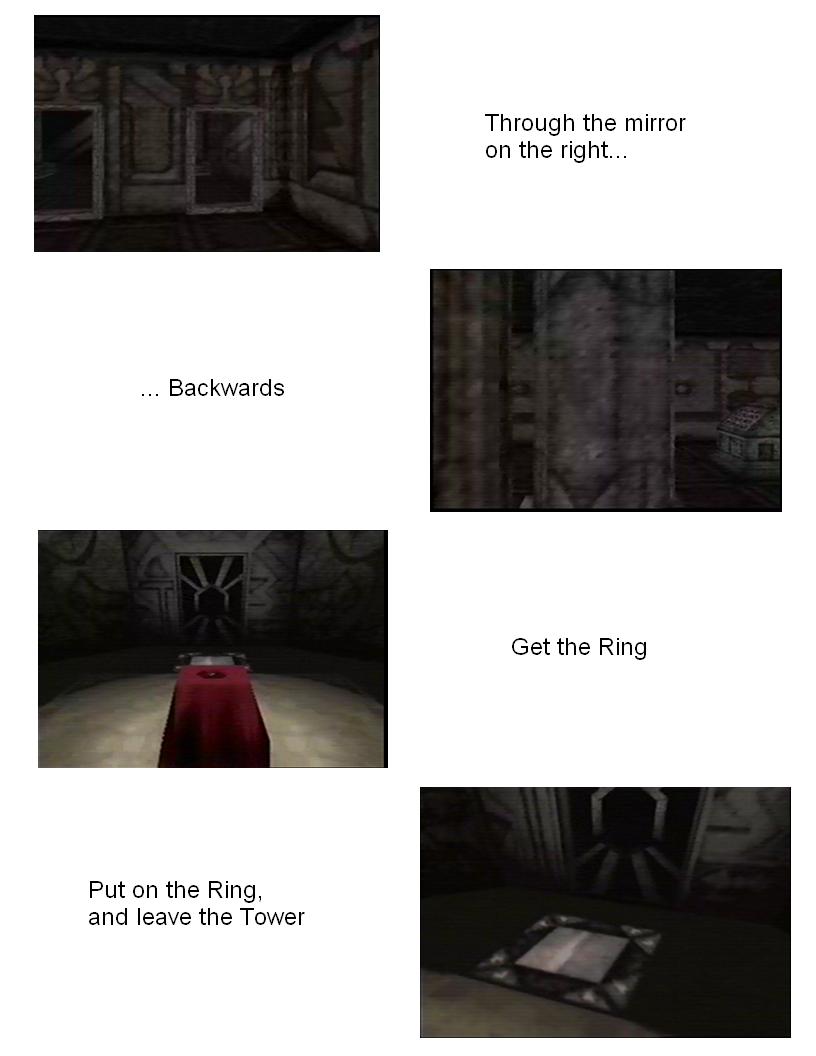
plaque to read. Turn to the right, and you'll see three mirrors in front of
you. Go up to the mirror on the right, turn around so you're facing away from
it, and walk backward into the mirror. You'll see a stand with a ring in front
of you. Walk up to it and press A to take The Ring of the Kingdom. Select it
from your inventory to put it on, and walk onto the white platform in front of
you. You'll be sent back to the entrance to the Trial Tower, and Lakmir will
appear and talk to you. Once he's done, turn around, head through the door, and
back out into the Waterway.
4.18: Waterway/Park/Pathway to Park/Street/Gate keeper's room/Disciples' Tower
Items you can get here now: Dragon Flute
Go forward, into the Park. Go forward and left through the door to the Pathway
to Park. Turn right, go forward, left, right and through the door into the
Street. Go forward, left, left, right and down the path to the Gate keeper's
room. Go forward and through the door on the right into the Disciples' Tower.
Turn to your right and go forward and you'll see a door with a dragon on it.
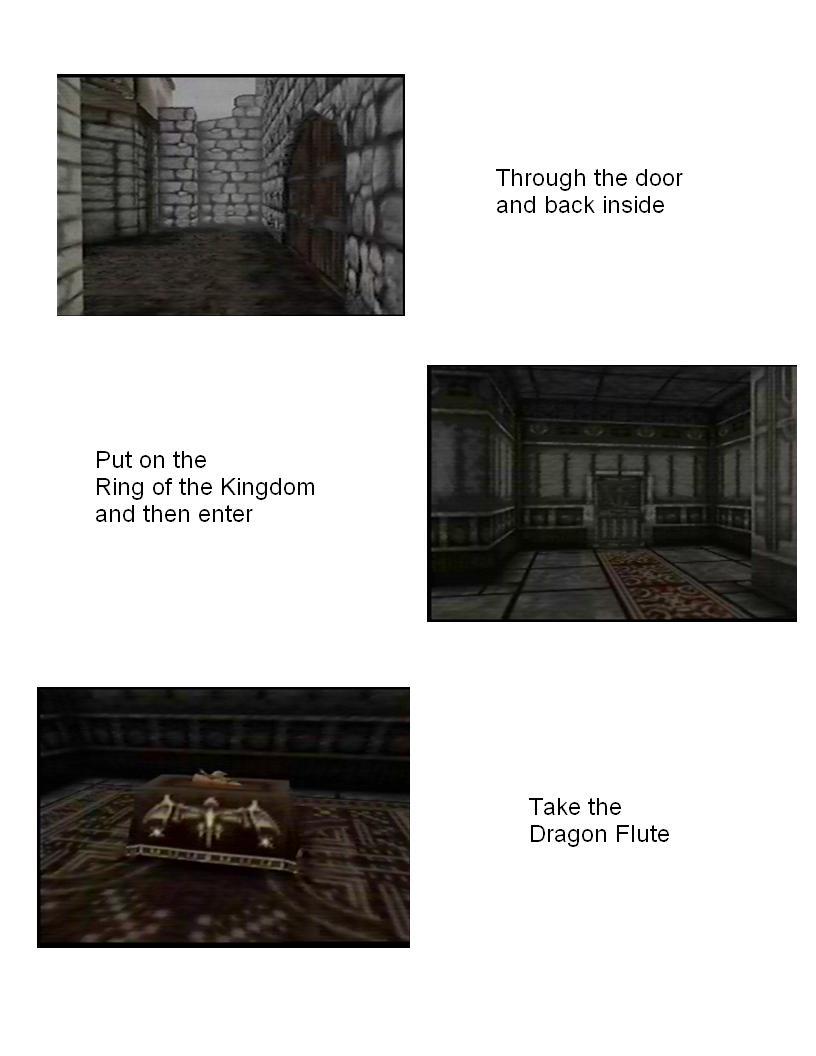
Make sure you're wearing The Ring of the Kingdom and press A to open it and
pass into the room. Inside, you'll see a table with an instrument on it. Walk
up to it and press A to get the Dragon Flute. Turn back around and go through
the door again, and then forward and to the right through the double doors,
back out into the Gate keeper's room.
4.19: Gate keeper's room/Street/Pathway to Park/Sorcerers Quarter/Excavation
Area 1/Excavation Area 2/Dragon Tower
Items you can get here now: Dragon Eye, The Staff of Ages
Turn left and go forward down the path to the Street. Go forward, left, right,
forward and through the door to your right into the Pathway to Park. Turn left,
go forward, right, and through the door at the end into the Sorcerers Quarter.
Go forward, right, and through the door into the Excavation Area 1. Go forward
and through the door on the left into the Excavation Area 1. Walk forward,
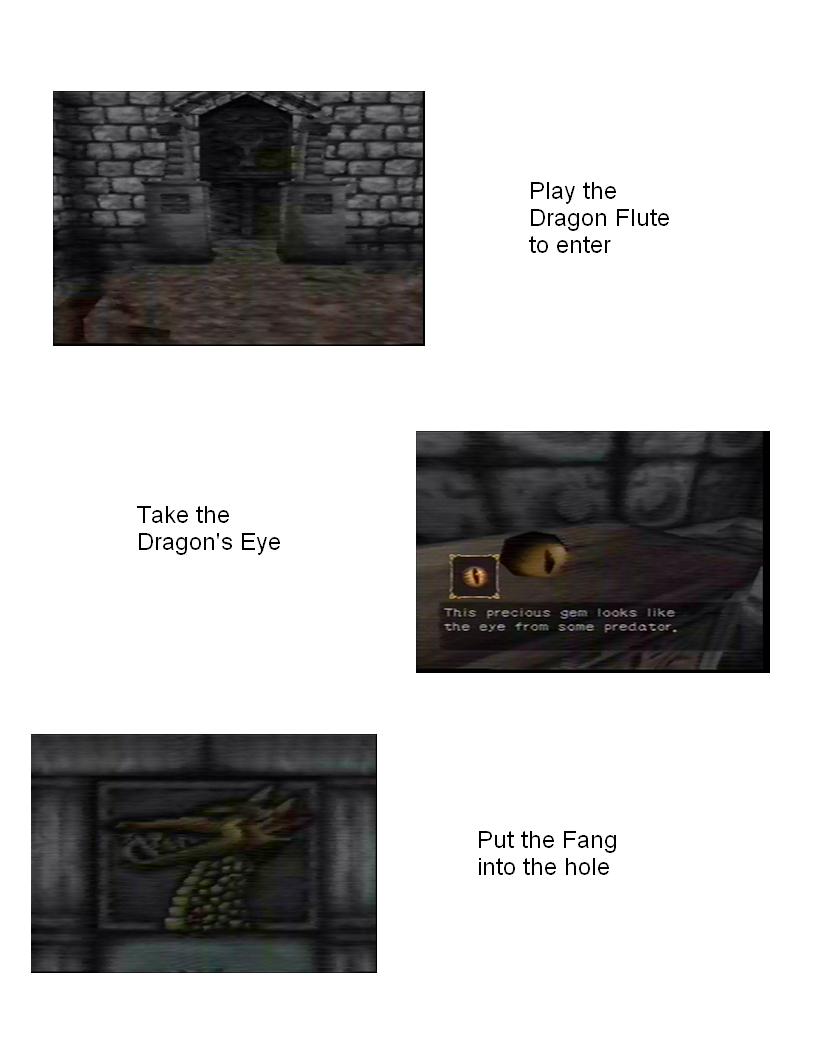
right, and stand in front of the door. Select the Dragon Flute from your
inventory to blow it, and the door will open, and you will enter the Dragon
Tower.
Follow the path around, going forward, left, forward, left. Midway down the
path will be a door on your left, go through it. Go forward and to the left,
and down a ladder. Turn to the left and there will be a table with an item on
it. Go over to it and pick up the item, the Dragon Eye. Turn around, go back up
the ladder, right and out the door. Go forward, left and at the end you'll come
to a dragon picture with a tooth missing. Select the Fang from your inventory
to put it in place, and a stairway will form in front of you. Go up the stairs
and continue around, forward, left, forward, left, forward, turn left and go up
some
more stairs. At the top of the stairs go forward, left, forward, left,
forward and you'll come to the stairs up to the next room.
Turn right and go through the door to enter the room. Go forward, and to the
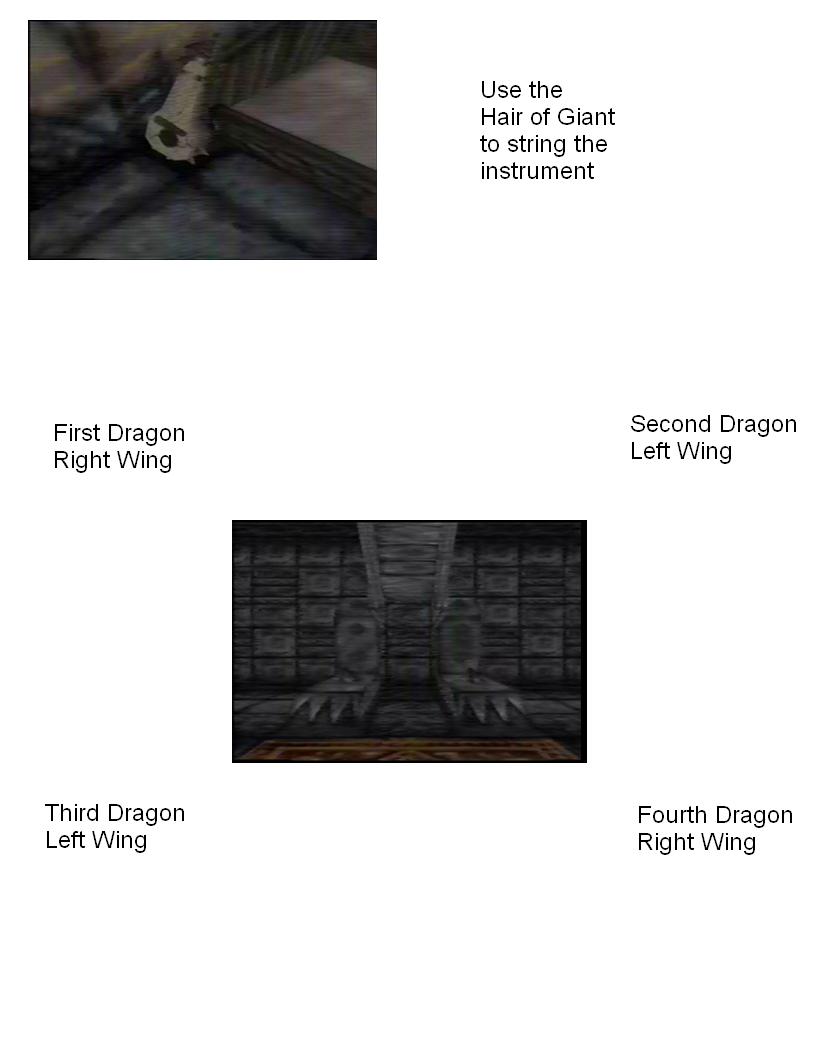
left of the bead you'll see an instrument. Go over to it, and select the Hair
of Giant from your inventory to put it on the instrument. Turn around, go
forward, and on your right there will be a door in the wall, go through it.
In this room will be a large dragon, and four small dragons around it. Go to
the dragon in the back to the left of the large dragon and press A. It will ask
you which wing you want to move, and move the Right wing, and it will start
playing a melody. Turn to the right and go over to the small dragon on the
other side of the large one, and move its Left wing to continue the melody. Now
turn around and go to your right, to the dragon that's diagonally across from
where you were, and move its Left wing. Now turn around and go to the last
dragon, and move its Right wing to finish the melody. The large dragon in the
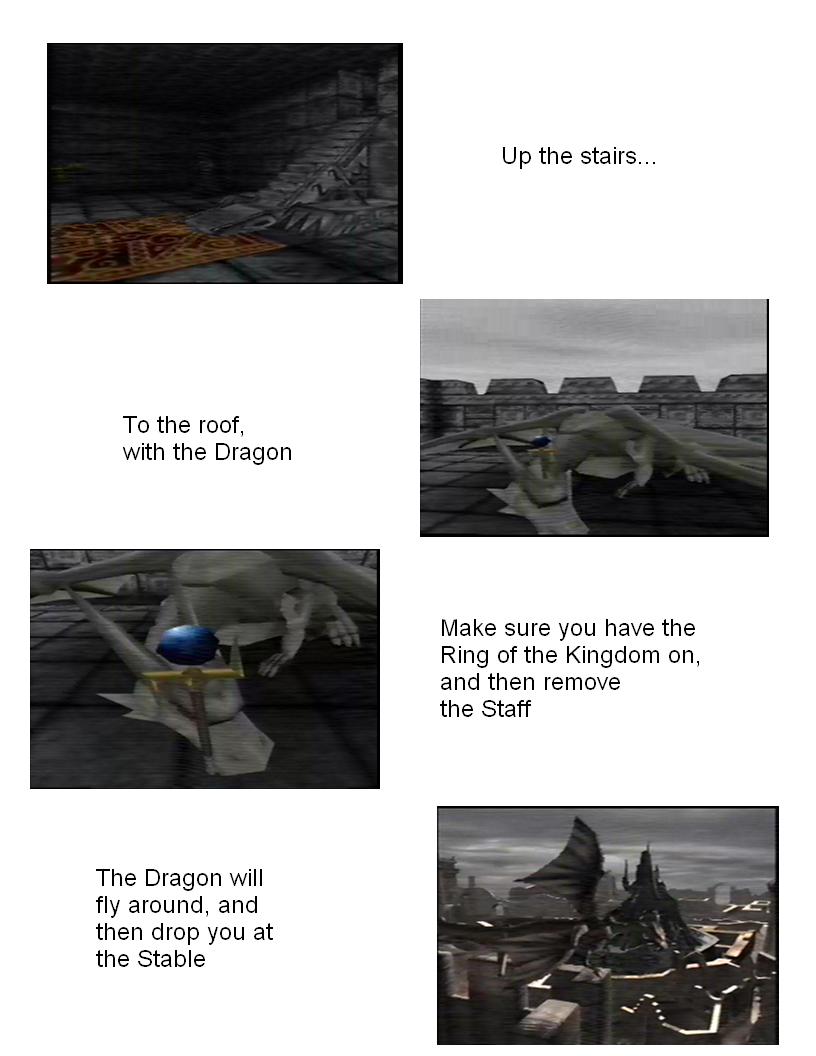
middle will lower its head, forming a stairway. Go up the stairs into the next
room.
You'll come up onto the roof of the tower, where you will see a dragon with a
staff in its head. Lakmir will appear and talk to you. Once he's done, walk
over to the dragon's head, make sure you have The Ring of the Kingdom on, and
press A. It will ask if you want to remove the staff, and do so. The staff
removed, the dragon will wake up. You'll get on the dragon, and it will fly up,
and drop you in the Stable.
4.20: Stable/Castle gate/Chamber of Holding
Items you can get here now: None
Turn to your left and you'll see a door. Go through it inside of the stable.
Walk over to the box on the floor in front of you, and select the Flint from
your inventory. A fire will start, and you exit the stable. Head forward, turn
left, go forward and through the door, into the Castle gate.
Turn right and you'll see a man standing in front of a door. Go over and talk
to him. Go over and talk to him, and after talking to him select Jezibel's
Pendant from your inventory. He'll leave, and you'll go through the door, into
the Chamber of Holding.
Walk forward, you'll go up a small set of stairs, and there will be a staff in
front of you. Stand in front of the staff and select the Dragon Eye from your
inventory to place it on the staff. After you do this, you'll watch as a series
of events take place. After they're done, Lakmir will appear and talk to you.
When he's done, turn to the right and head toward the opening, out into the
Pathway to Park.

4.21: Pathway to Park/Park
Items you can get here now: None
Turn to the left and go through the door, into the Park. You'll see a fun
little sight. When that's done, select The Ring of the Kingdom from your
inventory to put it on. Turn around, and head toward the fountain. The water's
gone, so you can walk right up to the statue.
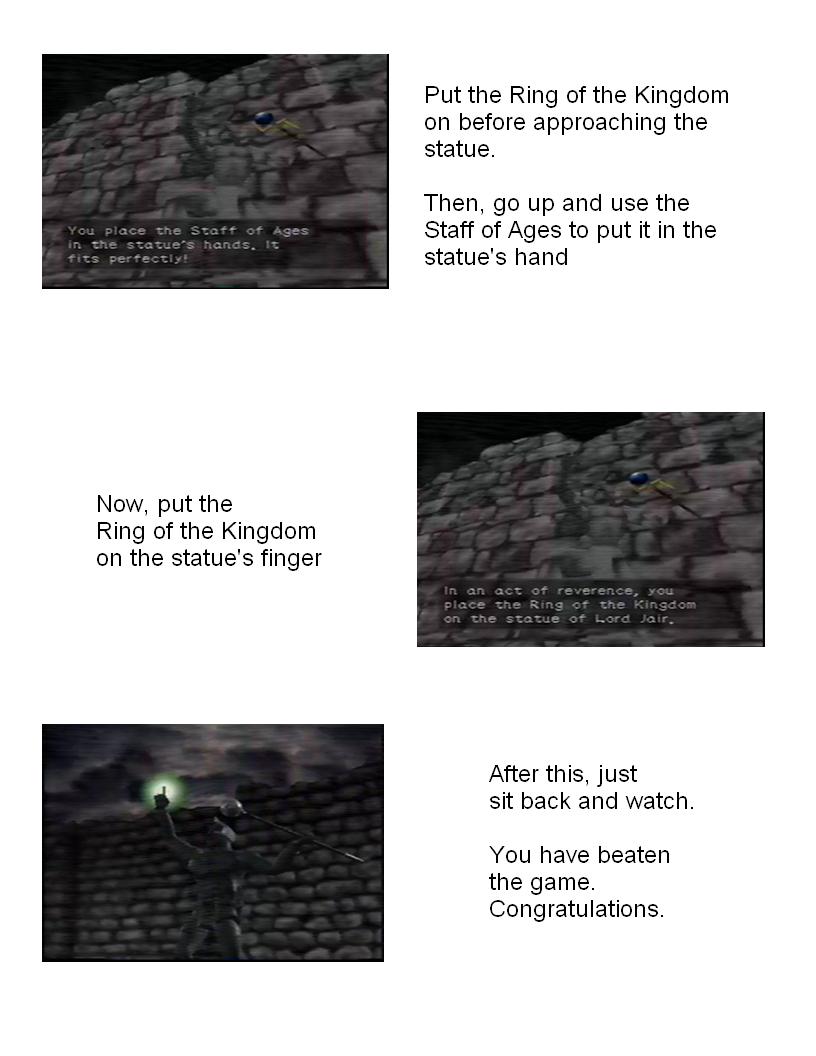
Select The Staff of Ages from your inventory, and you'll put the staff into the
statue's hand. Then, select The Ring of the Kingdom from your inventory, and it
will be put onto the statue's finger.
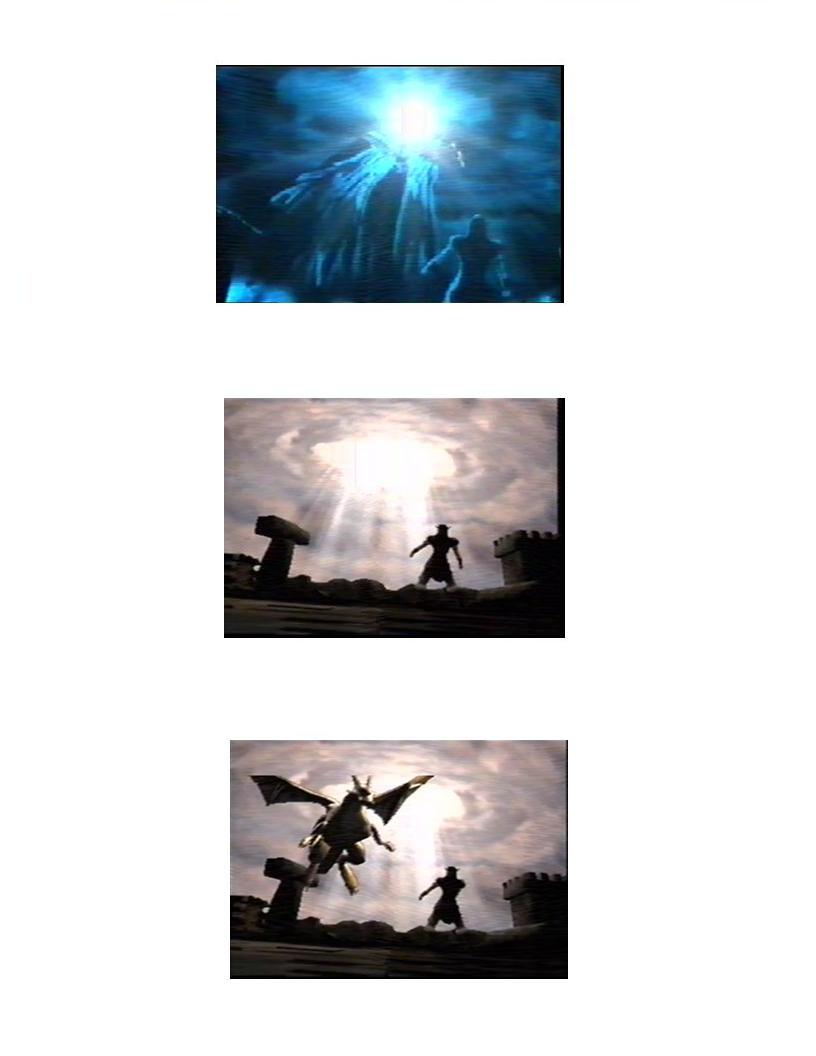
Now, just sit back and watch. You've completed the game. Congratulations.
-------------------------------------------------------------------------------
Section 5: Thanks
Well, as of right now I don’t really have any specific people to thank in the
creation of the guide. To my knowledge this guide should be fully complete,
but, if you happen to come across an error or some more information or
whatever, I can put your name in here as well. See Section 6 for contact
information.
I’d like to thank Gamefaqs and IGN for hosting this guide, I’d like to thank
you for reading this guide, and I’d like to thank all of the people and
companies involved in the creation of this game for making it, for giving me
much enjoyment with the game, as well as something to write about.
-------------------------------------------------------------------------------
Section 6: Contact
If you’d like to contact me for any reason at all, either with some
information, problems you have, or just to say you liked my guide and found it
helpful, feel free to write to me, at:
terrisus@aol.com
and put Shadowgate 64 FAQ (or something like that) as the subject.

-------------------------------------------------------------------------------
Section 7: Legal
This FAQ was entirely created by TerrisUS (terrisus@aol.com). It may not be displayed,
distributed, or altered without my agreement. The following websites have
permission to host this guide:
http://www.terrisus.com
http://www.gamefaqs.com
http://faqs.ign.com
That said, if you’d like to display or distribute this guide, I’d probably be
more than happy to let you, just please ask me first. See Section 6 for contact
information.

-------------------------------------------------------------------------------